K5プロジェクト間ルーティング – 完全自動化された共有サービスAPI デプロイメント
2017-01-18

Machine-translated from English. Read the English original
以前の投稿で、K5固有のネットワーク機能である「プロジェクト間ルーティング(Inter-Project routing)」について言及しました。K5は従来のプライベートOpenStackクラウドではなく、パブリックなOpenStackベースのクラウドであるため、契約所有者(別名:OpenStackドメイン管理者)は設計上、共有ネットワークを作成する権限を持っていません。しかし、多くの契約所有者はプロジェクト間でリソースを共有する必要性を感じることが多く、そこでK5のプロジェクト間ルーティングが活躍します。以前の「共有サービス」に関するブログ投稿は、すべてこの機能のおかげで可能になっています。
注: ここでは、同じアベイラビリティゾーンおよび契約内のプロジェクトサブネット間のルーティングについて話しています。クロスアベイラビリティゾーンリンクも可能であり、以前の投稿で議論されています。
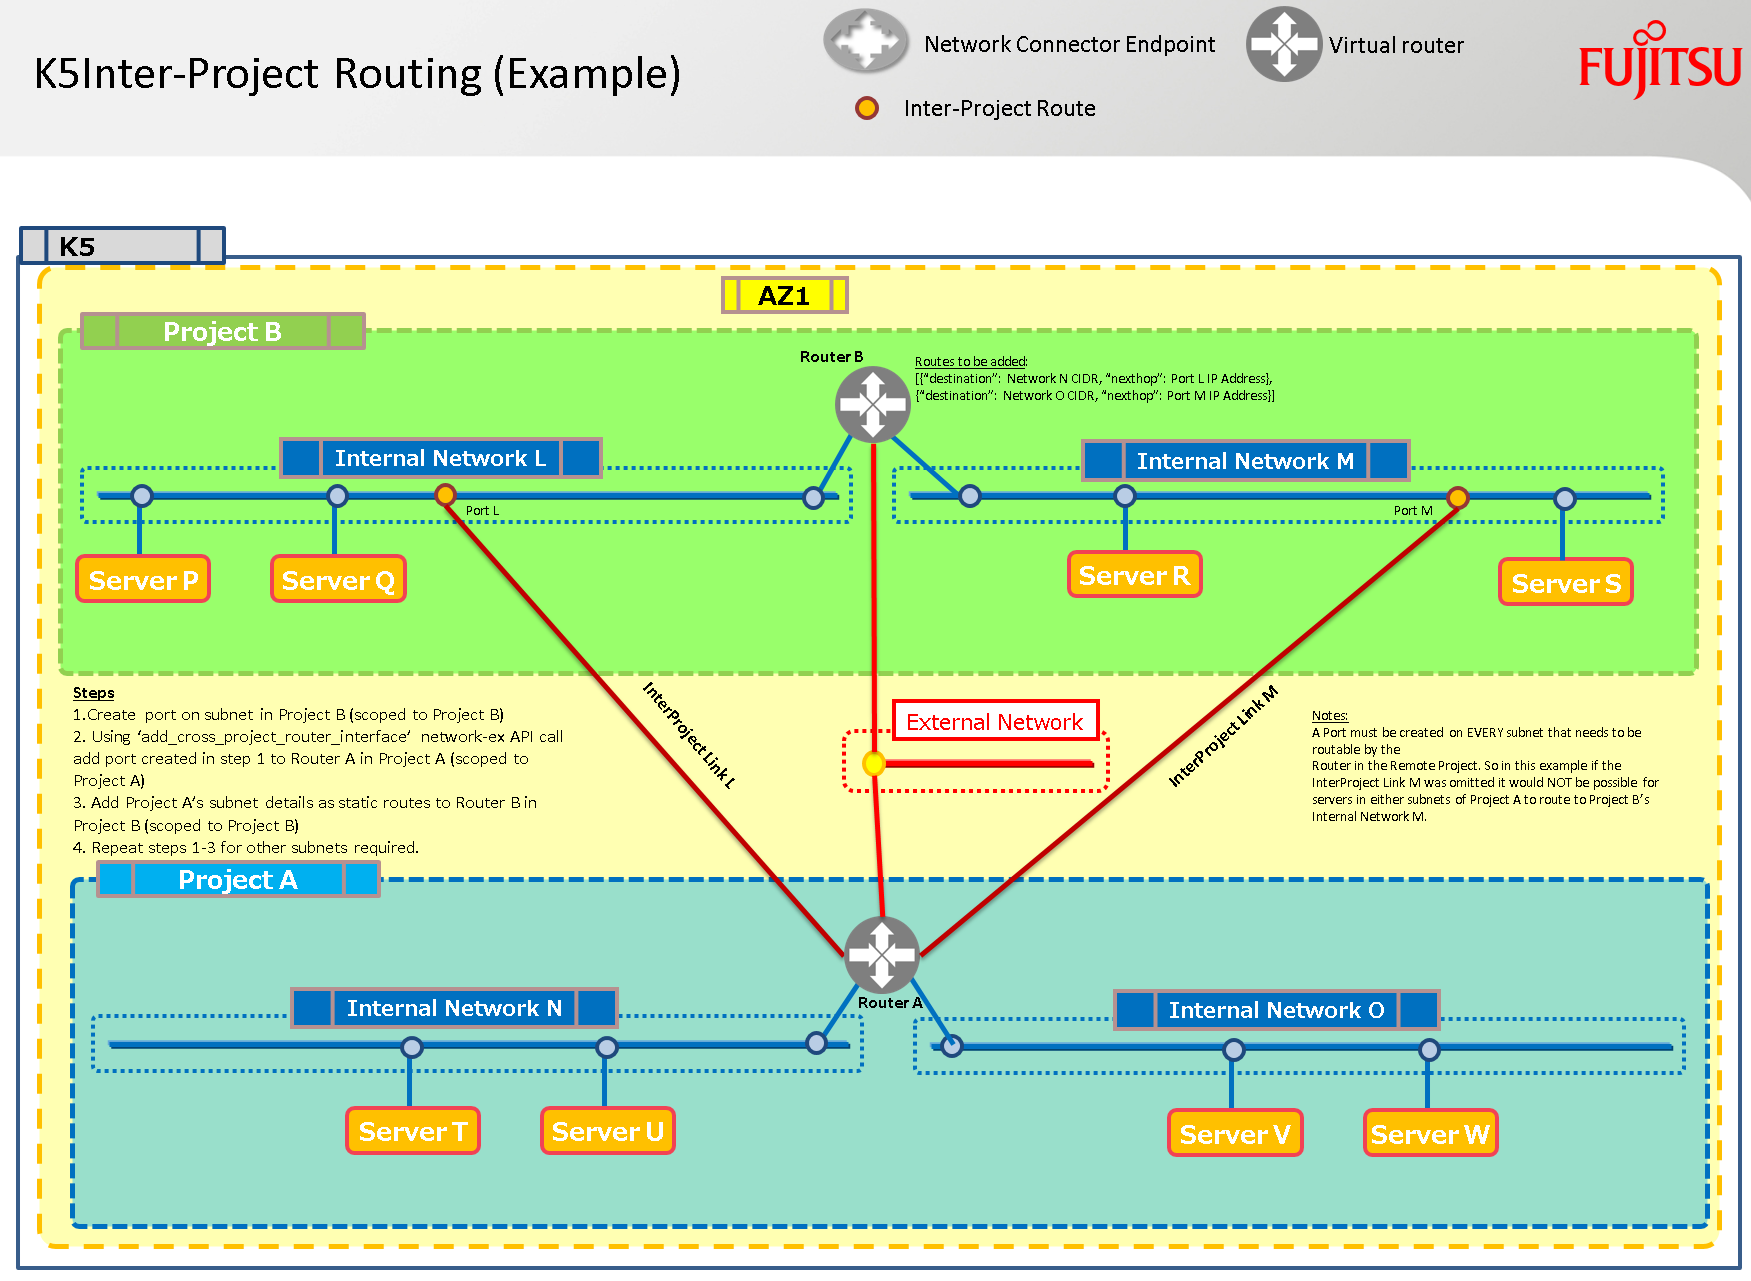
上記のプロジェクトAのサブネット上の仮想マシン(VM)が、プロジェクトBの両方のサブネット上のVMに到達可能にするには、プロジェクトBの各サブネットに対してプロジェクト間リンクを作成する必要があります。つまり、上記のシナリオでは2つのプロジェクト間リンクが必要になります!
サブネットごとに必要な手順
- プロジェクトBにスコープされたk5リージョナルトークンを取得する
このファイルには、以下に表示される内容とは異なる解釈やコンパイルが行われる可能性のある、非表示または双方向のUnicode文字が含まれています。確認するには、非表示のUnicode文字を表示するエディタでファイルを開いてください。
双方向のUnicode文字について詳しく見る
| def get_scoped_token(adminUser, adminPassword, contract, projectid, region): | |
| """Summary – Get a regional project scoped token using a username and password | |
| Returns: | |
| Object: Regionally Scoped Project Token Object | |
| Args: | |
| adminUser (TYPE): username | |
| adminPassword (TYPE): password | |
| contract (TYPE): contract name | |
| projectid (TYPE): project id | |
| region (TYPE): region | |
| """ | |
| identityURL = 'https://identity.' + region + \ | |
| '.cloud.global.fujitsu.com/v3/auth/tokens' | |
| try: | |
| response = requests.post(identityURL, | |
| headers={'Content-Type': 'application/json', | |
| 'Accept': 'application/json'}, | |
| json={"auth": | |
| {"identity": | |
| {"methods": ["password"], "password": | |
| {"user": | |
| {"domain": | |
| {"name": contract}, | |
| "name": adminUser, | |
| "password": adminPassword | |
| }}}, | |
| "scope": | |
| {"project": | |
| {"id": projectid | |
| }}}}) | |
| return response | |
| except: | |
| return 'Regional Project Token Scoping Failure' |
view raw
Get_Scoped_Token.py
hosted with ❤ by GitHub
- プロジェクトBのサブネット上にポートを作成する
このファイルには、以下に表示される内容とは異なる解釈やコンパイルが行われる可能性のある、非表示または双方向のUnicode文字が含まれています。確認するには、非表示のUnicode文字を表示するエディタでファイルを開いてください。
双方向のUnicode文字について詳しく見る
| def create_port(k5token, name, netid, sg_id, az, region): | |
| portURL = 'https://networking.' + region + \ | |
| '.cloud.global.fujitsu.com/v2.0/ports' | |
| try: | |
| response = requests.post(portURL, | |
| headers={ | |
| 'X-Auth-Token': k5token, 'Content-Type': 'application/json', 'Accept': 'application/json'}, | |
| json={"port": | |
| {"network_id": netid, | |
| "name": name, | |
| "admin_state_up": True, | |
| "availability_zone": az, | |
| "security_groups": | |
| [sg_id]}}) | |
| return response | |
| except: | |
| return ("\nUnexpected error:", sys.exc_info()) |
view raw
CreatePortonK5Subnet.py
hosted with ❤ by GitHub
- 新しく作成されたポートのport_idを取得する
- K5トークンをプロジェクトBからプロジェクトAに再スコープする
このファイルには、以下に表示される内容とは異なる解釈やコンパイルが行われる可能性のある、非表示または双方向のUnicode文字が含まれています。確認するには、非表示のUnicode文字を表示するエディタでファイルを開いてください。
双方向のUnicode文字について詳しく見る
| def get_rescoped_token(k5token, projectid, region): | |
| """Get a regional project token – rescoped | |
| Returns: | |
| STRING: Regionally Scoped Project Token | |
| Args: | |
| k5token (TYPE): valid regional token | |
| projectid (TYPE): project id to scope to | |
| region (TYPE): k5 region | |
| """ | |
| identityURL = 'https://identity.' + region + \ | |
| '.cloud.global.fujitsu.com/v3/auth/tokens' | |
| try: | |
| response = requests.post(identityURL, | |
| headers={'Content-Type': 'application/json', | |
| 'Accept': 'application/json'}, | |
| json={ | |
| "auth": { | |
| "identity": { | |
| "methods": [ | |
| "token" | |
| ], | |
| "token": { | |
| "id": k5token | |
| } | |
| }, | |
| "scope": { | |
| "project": { | |
| "id": projectid | |
| } | |
| } | |
| } | |
| }) | |
| return response | |
| except: | |
| return 'Regional Project Rescoping Failure' |
view raw
ReScope_K5_Token.py
hosted with ❤ by GitHub
- 富士通K5のNeutron拡張API呼び出しを使用します。これはアップストリームのOpenStackでは利用できません。このAPI呼び出しにより、プロジェクト管理者は、異なるプロジェクトのサブネットからインターフェースを、管理者のプロジェクトのルーターに追加できます。
このファイルには、以下に表示される内容とは異なる解釈やコンパイルが行われる可能性のある、非表示または双方向のUnicode文字が含まれています。確認するには、非表示のUnicode文字を表示するエディタでファイルを開いてください。
双方向のUnicode文字について詳しく見る
| def inter_project_connection_create(k5token, router, port, region): | |
| routerURL = 'https://networking-ex.' + region + \ | |
| '.cloud.global.fujitsu.com/v2.0/routers/' + \ | |
| router + '/add_cross_project_router_interface' | |
| try: | |
| response = requests.put(routerURL, | |
| headers={'X-Auth-Token': k5token, | |
| 'Content-Type': 'application/json'}, | |
| json={"port_id": port}) | |
| return response | |
| except: | |
| return ("\nUnexpected error:", sys.exc_info()) |
view raw
AddInterPojectRoute.py
hosted with ❤ by GitHub
- K5トークンをプロジェクトBに再スコープする(投稿の前半で詳述されたトークン再スコープAPI呼び出し)
- プロジェクトAのネットワークに対する静的な戻りルーティングを、プロジェクトBのルーターに追加する(注: プロジェクトBにルーターがない設計の場合、これらのルートをプロジェクトBのサブネットに追加し、サーバーを再起動して新しいルーティング情報を受け取ることができます)
- ルーティングの形式は [{“destination”: CIDR-1, “nexthop”: interProject-Port-IP},{“destination”: CIDR-2, “nexthop”: interProject-Port-IP} ]
ルーターの更新
このファイルには、以下に表示される内容とは異なる解釈やコンパイルが行われる可能性のある、非表示または双方向のUnicode文字が含まれています。確認するには、非表示のUnicode文字を表示するエディタでファイルを開いてください。
双方向のUnicode文字について詳しく見る
| def update_router_routes(k5token, routerid, routes, region): | |
| # e.g. routes = [{'destination': '192.168.10.0/24', 'nexthop': u'192.168.100.2'}, {'destination': '192.168.11.0/24', 'nexthop': u'192.168.100.2'}] | |
| try: | |
| routerURL = 'https://networking-ex.' + region + \ | |
| '.cloud.global.fujitsu.com/v2.0/routers/' + routerid | |
| response = requests.put(routerURL, | |
| headers={'X-Auth-Token': k5token, | |
| 'Content-Type': 'application/json'}, | |
| json={"router": {"routes": routes}}) | |
| return response | |
| except: | |
| return ("\nUnexpected error:", sys.exc_info()) |
view raw
K5-Update-Router-Routes.py
hosted with ❤ by GitHub
代替サブネットの更新
このファイルには、以下に表示される内容とは異なる解釈やコンパイルが行われる可能性のある、非表示または双方向のUnicode文字が含まれています。確認するには、非表示のUnicode文字を表示するエディタでファイルを開いてください。
双方向のUnicode文字について詳しく見る
| def add_static_route_to_subnet(k5token, subnetid, routes, region): | |
| # e.g. routes = = [{'destination': '192.168.101.0/24', 'nexthop': u'192.168.100.2'},{'destination': '192.168.100.0/24', 'nexthop': u'192.168.100.2'}] | |
| subnetURL = 'https://networking.' + region + \ | |
| '.cloud.global.fujitsu.com/v2.0/subnets/' + subnetid | |
| try: | |
| response = requests.put(subnetURL, | |
| headers={'X-Auth-Token': k5token, | |
| 'Content-Type': 'application/json'}, | |
| json={"subnet": {"host_routes": routes}}) | |
| return response | |
| except: | |
| return ("\nUnexpected error:", sys.exc_info()) |
view raw
K5-Subnet-Route-Update.py
hosted with ❤ by GitHub
これで完了です! これで、プロジェクト間でルーティングできるようになるはずです。
自動化はどこにあるのか、とあなたは思っているかもしれませんね…
さて、私は顧客デモのために以下の2つのPythonスクリプトをすぐに「ハック」して組み立てました。Pythonコードは決して効率的(DRY原則準拠)ではありませんが、このチュートリアルの目的には十分適しています:
リポジトリ : https://github.com/allthingsclowd/K5-InterProject-Demo
K5-InterProject-Demo
Fujitsu K5上の完全自動化された共有サービスAPIデプロイメント
ターゲット – Fujitsu K5 IaaSクラウドプラットフォーム
著者: Graham Land
日付: 2017年1月18日
Twitter: @allthingsclowd
Github: https://github.com/allthingscloud
ブログ: https://allthingscloud.eu
このリポジトリのPythonスクリプトを使用して、以下の共有サービスモデルを自動的(魔法のように)に作成できます 🙂

手順:
- これらのファイルすべてを同じディレクトリにコピーします
- k5contractsettingsv10.pyを編集して、K5契約の詳細を含めます
警告: 契約内の2つの「使い捨て」プロジェクトを使用し、それらの名前とIDを上記ファイルに追加してください。
これらのプロジェクト内のすべてのリソースは削除されるため、他のユーザーと共有していないことを確認してください。 - build_multi_project_demo.pyスクリプトを実行して、リラックスしてください! すべてのSSHキー、パブリックIPなどはコンソールに返されます。
- ルーティングの操作が完了したら、purge_project.pyを使用してすべてをリセットできます。
Happy Stacking!
view raw
MultiProjectAPIDemo.md
hosted with ❤ by GitHub
Happy Stacking!
withk5youcan
Originally published on allthingscloud.eu (2017-01-18).