OpenStack Liberty CLI & 複数NATゲートウェイ
2016-05-26

Machine-translated from English. Read the English original
顧客は常に、私たちが幸運を祈って訓練されてきた単純なグリーンフィールドラボセットアップではなく、現実的な本番環境のソリューションを求めています。現在のプロジェクトも例外ではなく、ラボセットアップから逸脱しているものの、その要件は決してユニークなものではないと想像します。シングルリージョン「ミッドスケール」OpenStack HA制御プレーンで、ESXとKVMの両方のハイパーバイザーを使用し、もちろんNATゲートウェイは1つではなく複数です。まだ興味がある方は読み進めてください – 環境はすでに構築されており、複数のNATゲートウェイも含まれています[自分へのメモ:おそらく別のブログ記事にする価値がある]。テナントネットワークにはVLANが使用され、CVR(集中型仮想ルーティング、別名レガシールーティング)を備えた3つの専用ネットワークノードがセットアップされています。
概要
このブログでは、OpenStackコマンドラインインターフェース(CLI)のみを使用して、以下の環境を構築するために必要な手順を詳述します。
- dev/testプロジェクト
- 単一の/24プライベートテナントネットワーク
- 2つの3ティアアプリケーションサーバー:Web-1、App-1、DB-1およびWeb-2、App-2、DB-2。
-
両方の3ティアアプリケーション間の分離を提供するためのセキュリティグループ。
-
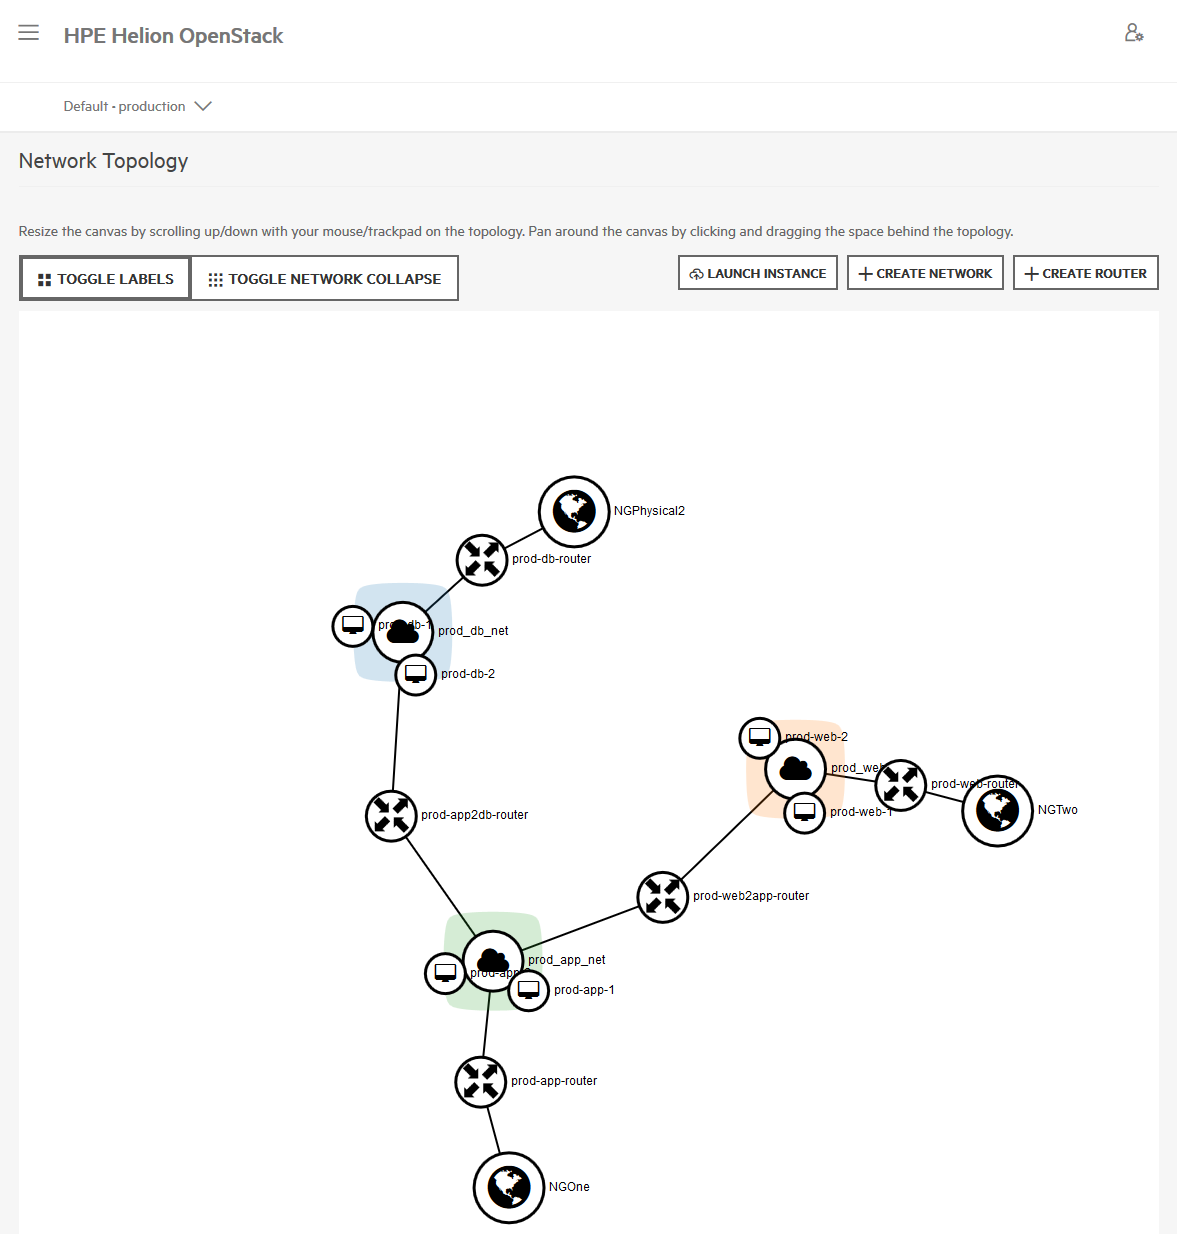
本番プロジェクト
- 3つの/24プライベートテナントネットワーク – 各アプリケーションティアごとに1つ
- 2つの3ティアアプリケーションサーバー:Web-1、App-1、DB-1およびWeb-2、App-2、DB-2。サーバーVMはそれぞれのネットワークティア上に配置されます。
-
両方の3ティアアプリケーション間の分離を提供するためのセキュリティグループ。
-
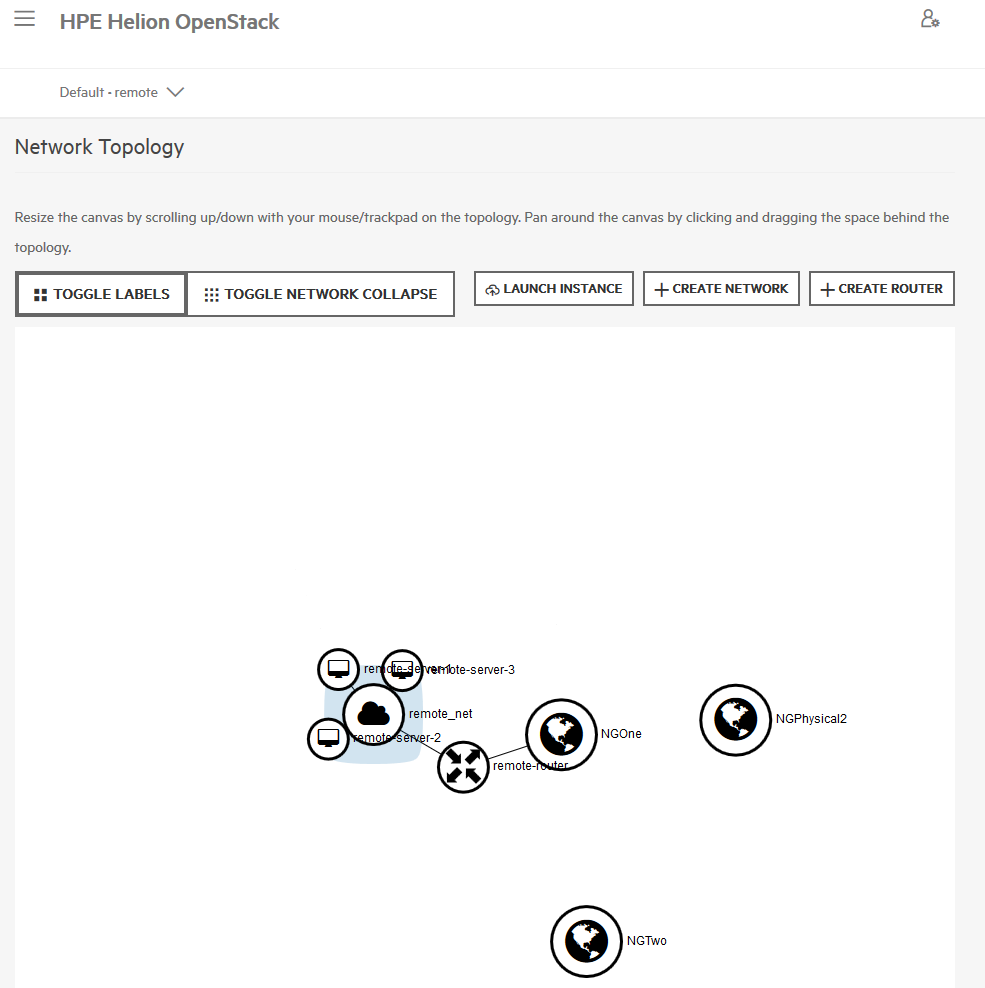
リモートサーバープロジェクト
-
このプロジェクトは、フローティングIPが割り当てられ、アクセスデモンストレーションのために外部サーバーを表すために使用される2つの異なるデータベースサーバーをホストするために使用されます。
-
すべてのサーバーに対するSNAT
-
複数のNATゲートウェイ、またはフローティングIPを備えた複数の外部ネットワーク。
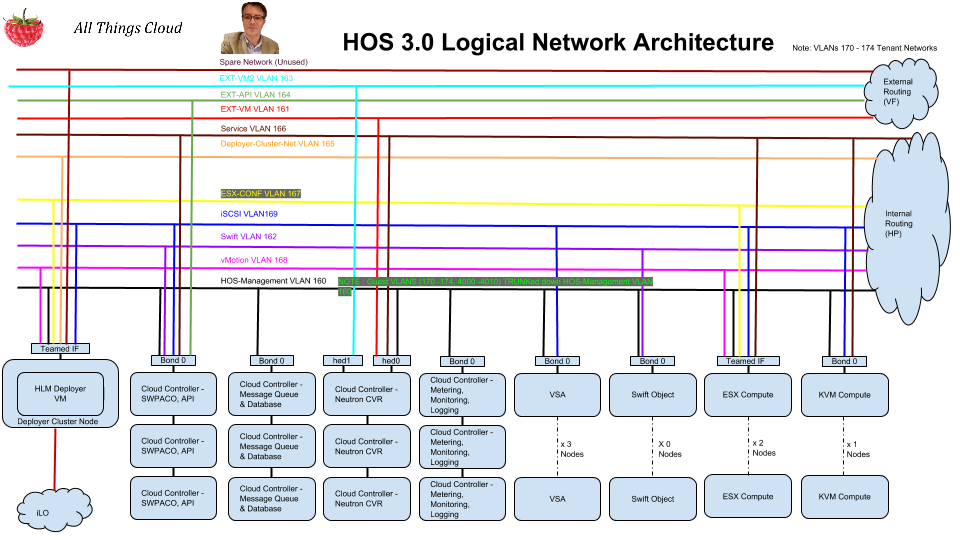
マルチハイパーバイザーHOS 3.0のインストールはすでに正常に完了しており、その高レベルのアーキテクチャは以下に示されています。
手順
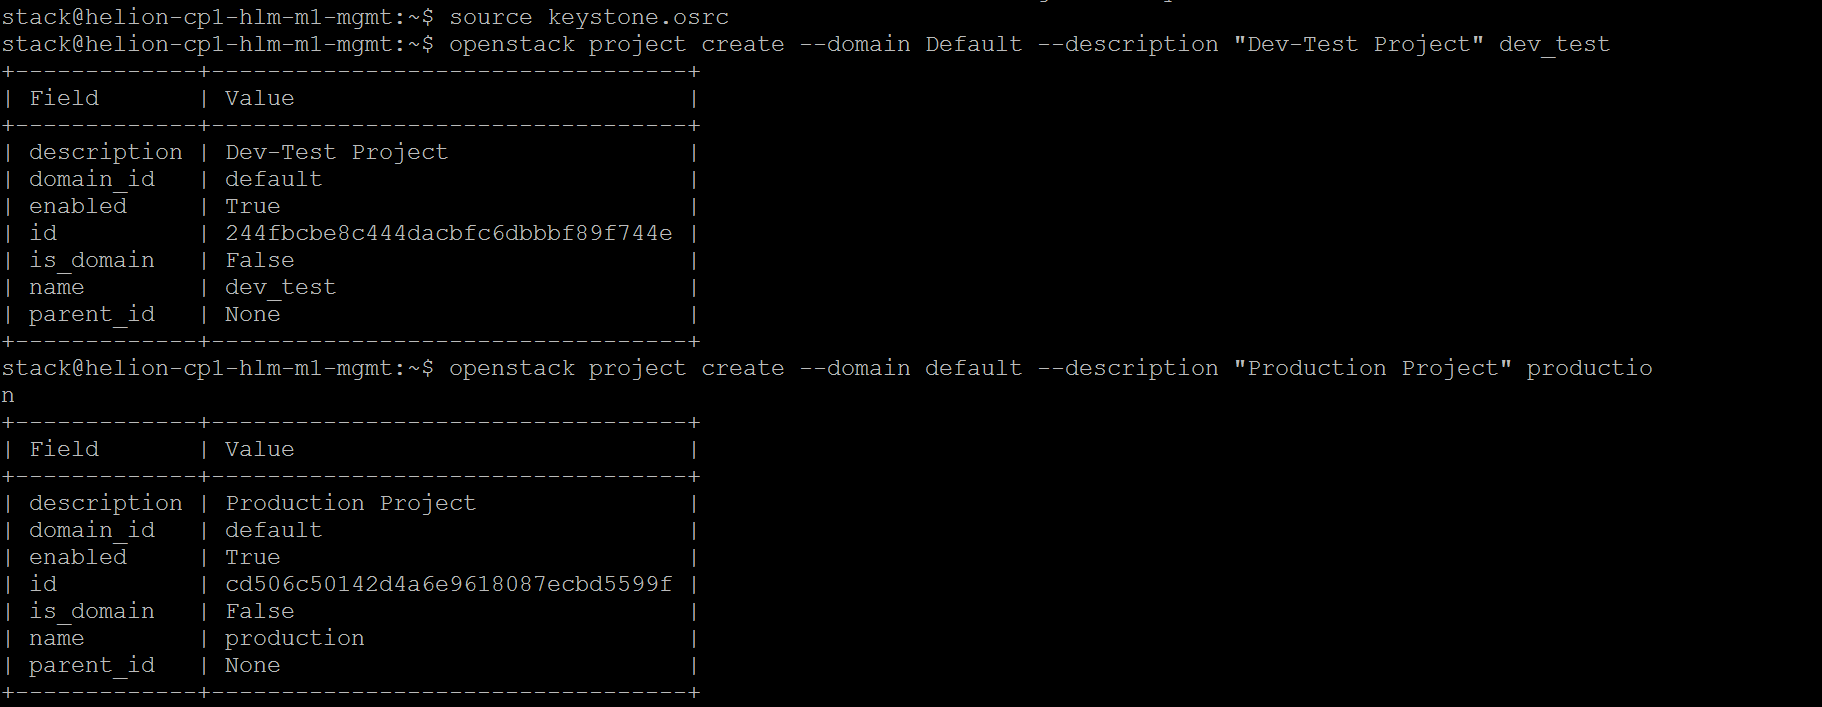
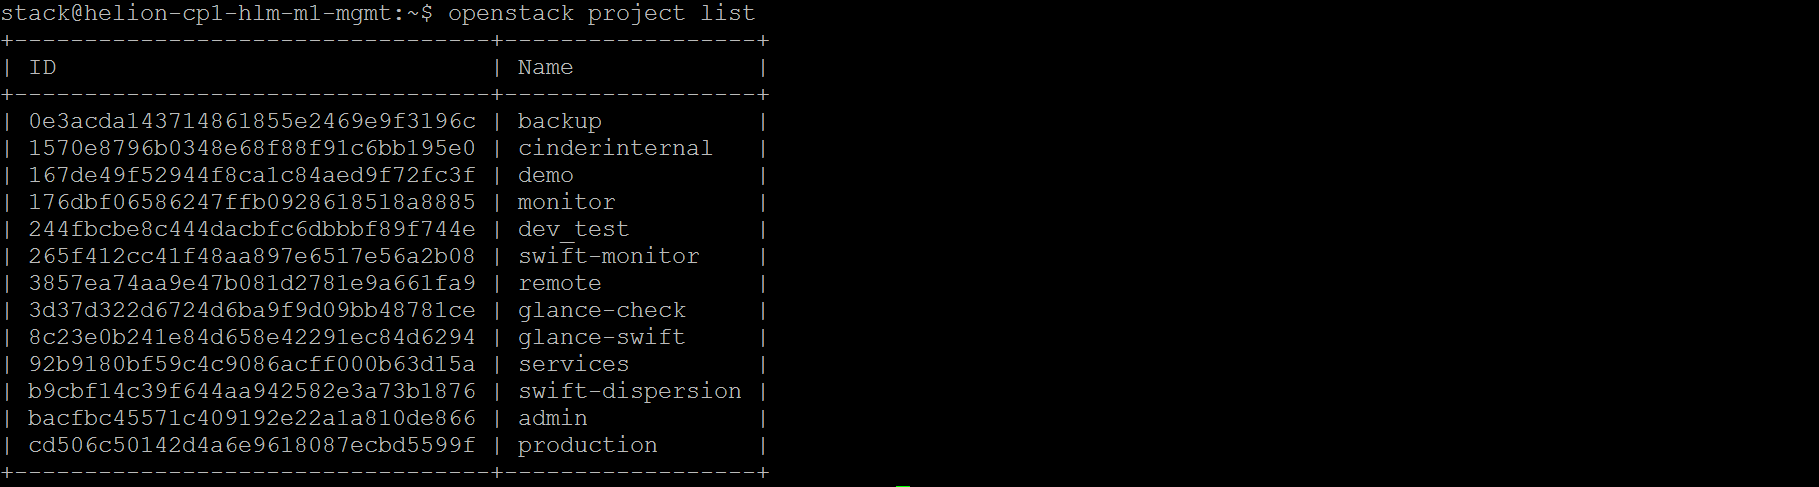
- 3つの新しいプロジェクトを作成する – dev_test、production & remote
- openstack project create –domain default –description “Dev-Test Project” dev_test
- openstack project create –domain default –description “Production Project” production
- openstack project create –domain default –description “Remote Servers for Demo Only” remote

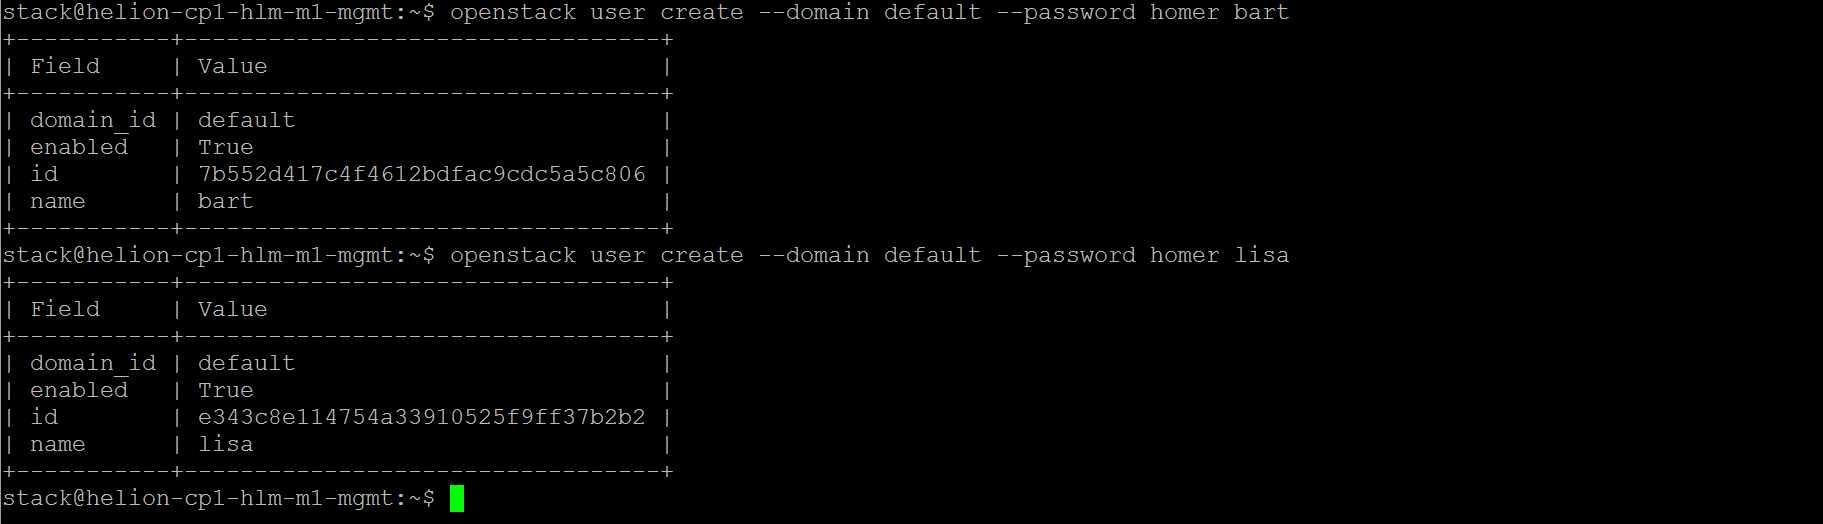
- 2人の新しいユーザーを作成する – Bart the Admin & Lisa the Operator
- openstack user create –domain default –password homer bart
- openstack user create –domain default –password homer lisa
- adminロールをプロジェクトとbartに追加する
- openstack role add –project remote –user bart admin
- openstack role add –project production –user bart admin
- openstack role add –project dev_test –user bart admin
- memberロールをプロジェクトとlisaに追加する
- openstack role add –project remote –user lisa _member_
- openstack role add –project production –user lisa _member_
- openstack role add –project dev_test –user lisa _member_

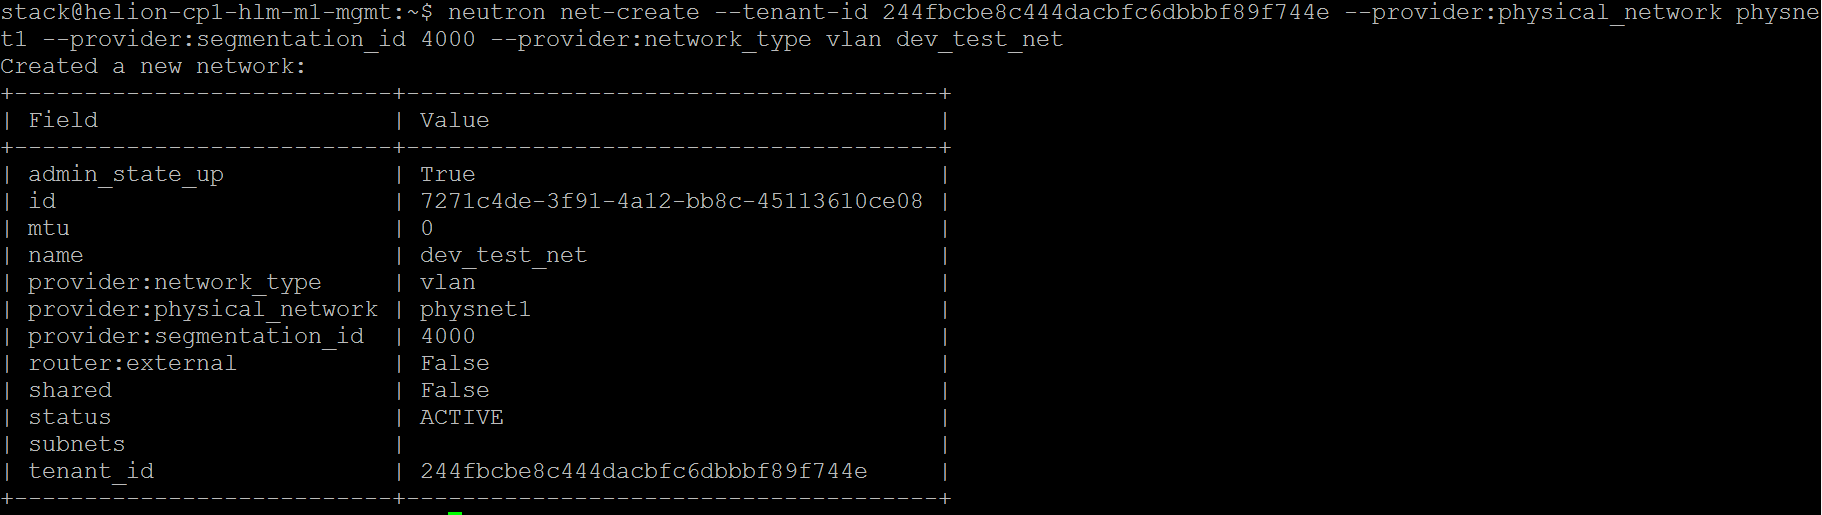
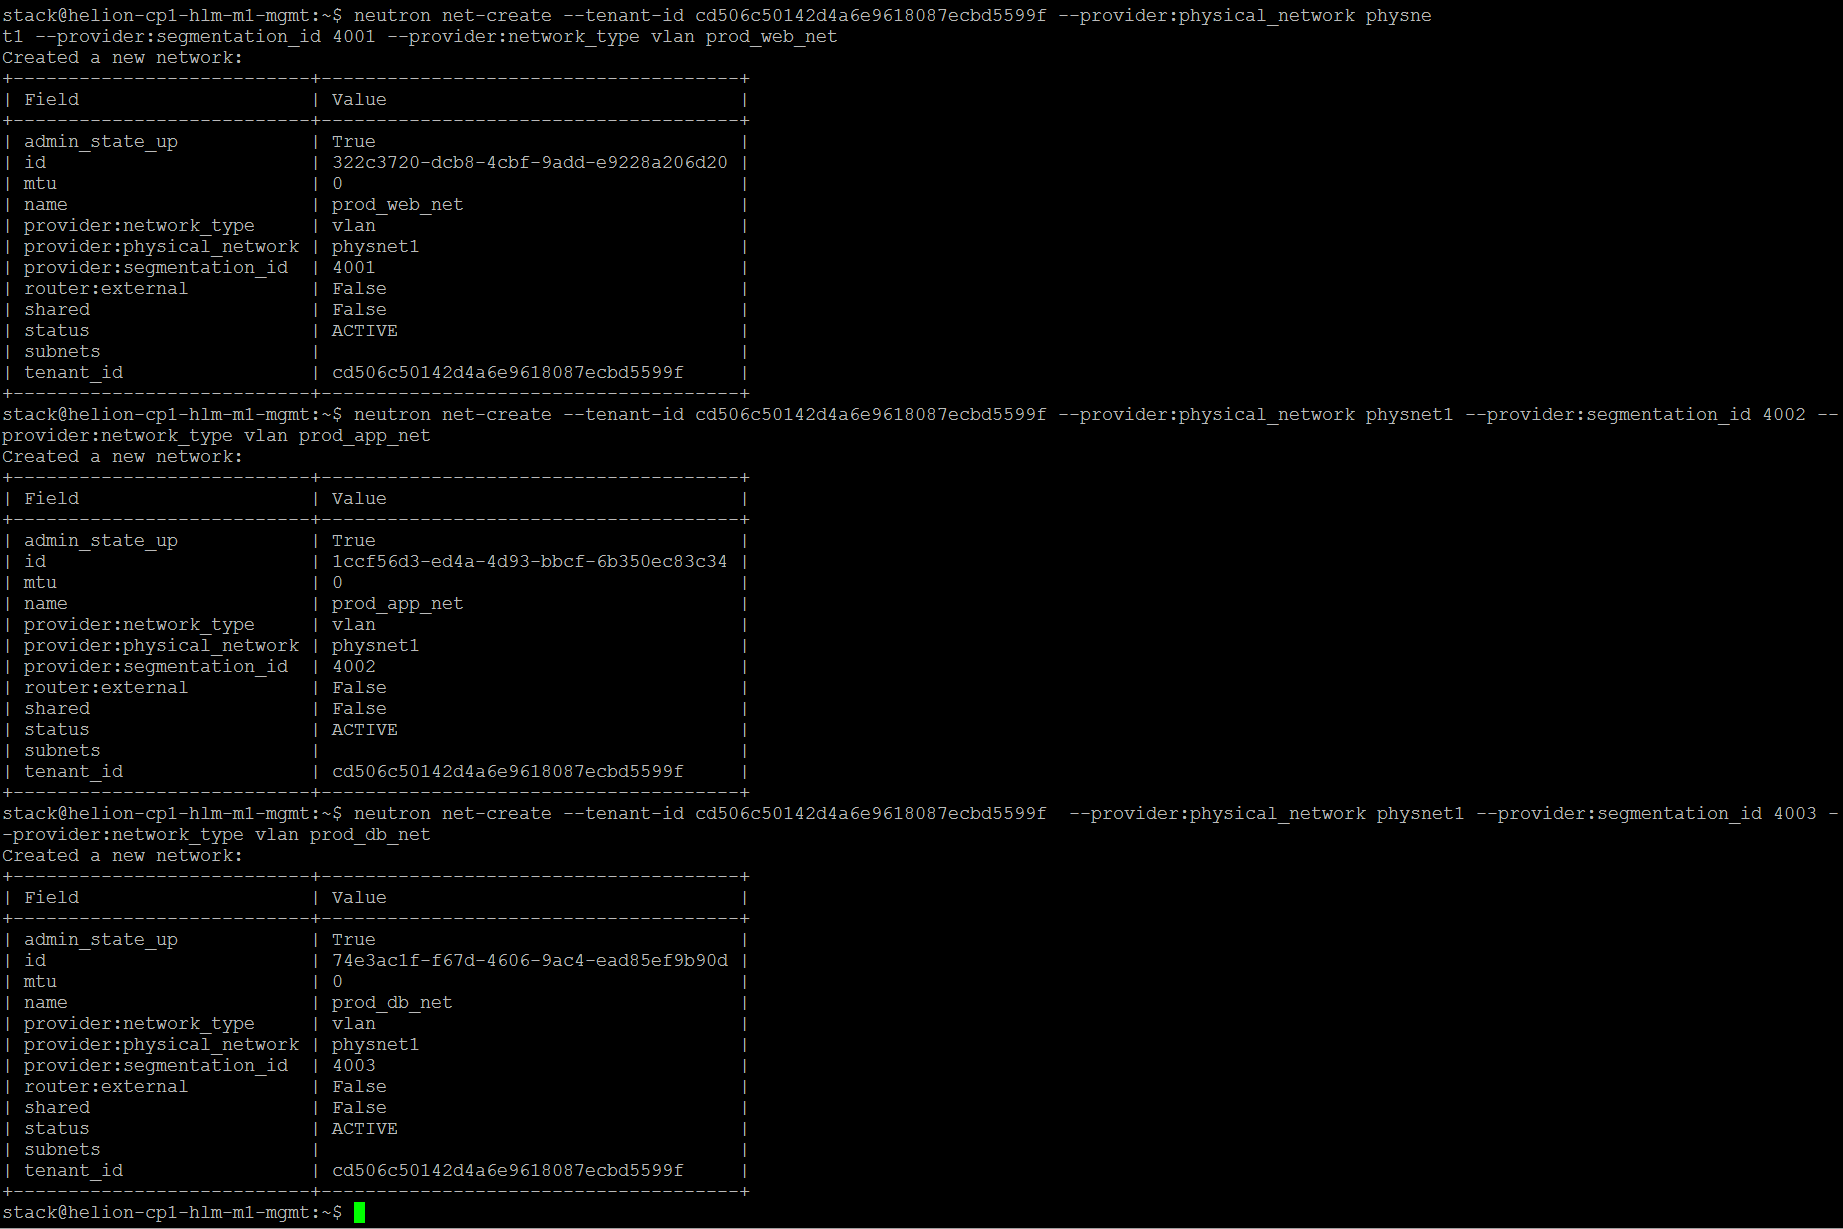
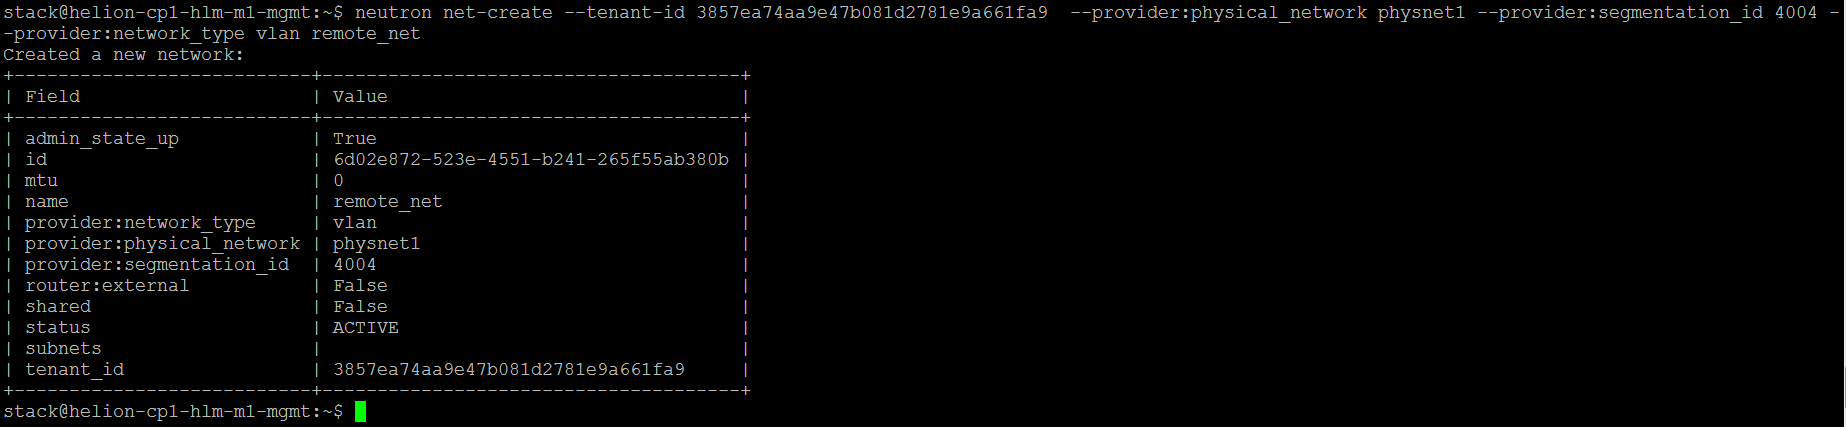
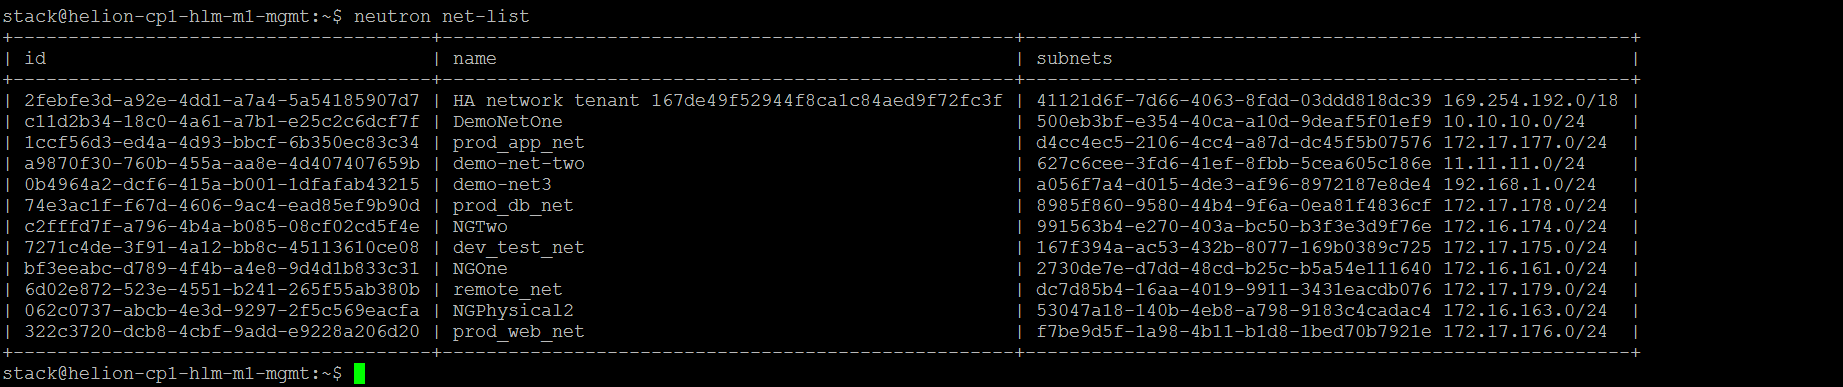
- 上記のように、VLAN ID 4000-4010を使用して新しいVLANテナントネットワークを作成し、それぞれのプロジェクトに関連付ける
- neutron net-create –tenant-id 244fbcbe8c444dacbfc6dbbbf89f744e –provider:physical_network physnet1 –provider:segmentation_id 4000 –provider:network_type vlan dev_test_net
-
- neutron net-create –tenant-id cd506c50142d4a6e9618087ecbd5599f –provider:physical_network physnet1 –provider:segmentation_id 4001 –provider:network_type vlan prod_web_net
- neutron net-create –tenant-id cd506c50142d4a6e9618087ecbd5599f –provider:physical_network physnet1 –provider:segmentation_id 4002 –provider:network_type vlan prod_app_net
- neutron net-create –tenant-id cd506c50142d4a6e9618087ecbd5599f –provider:physical_network physnet1 –provider:segmentation_id 4003 –provider:network_type vlan prod_db_net
- neutron net-create –tenant-id 3857ea74aa9e47b081d2781e9a661fa9 –provider:physical_network physnet1 –provider:segmentation_id 4004 –provider:network_type vlan remote_net
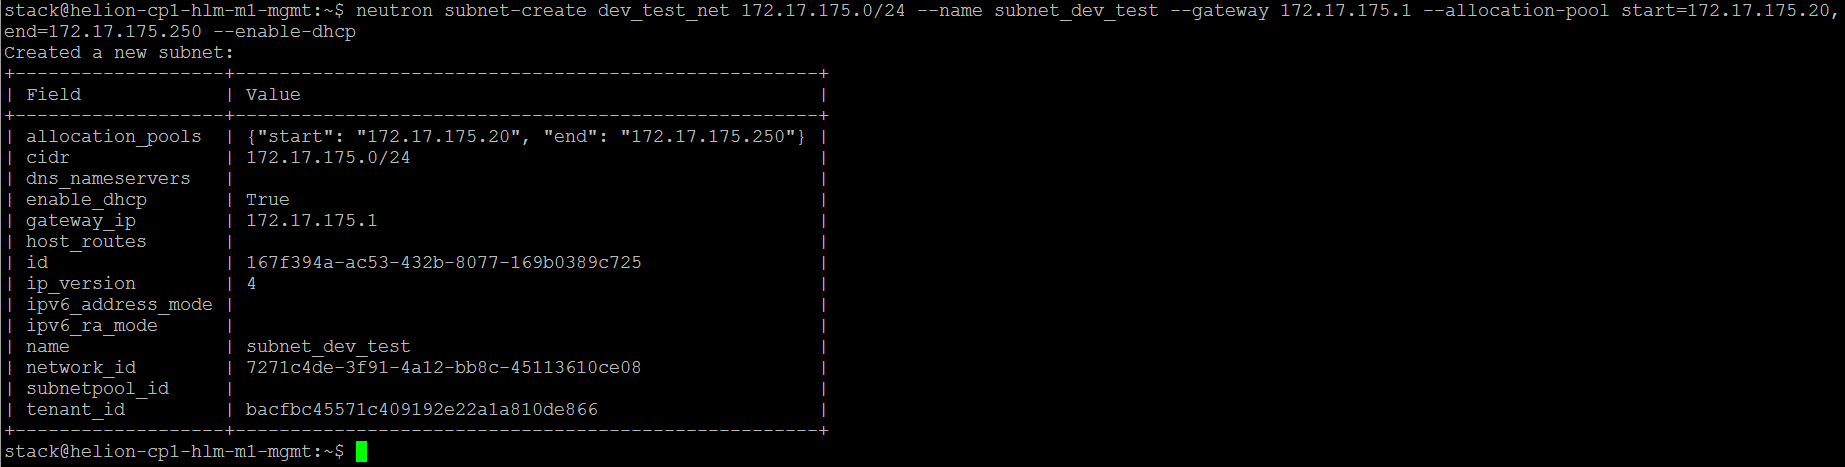
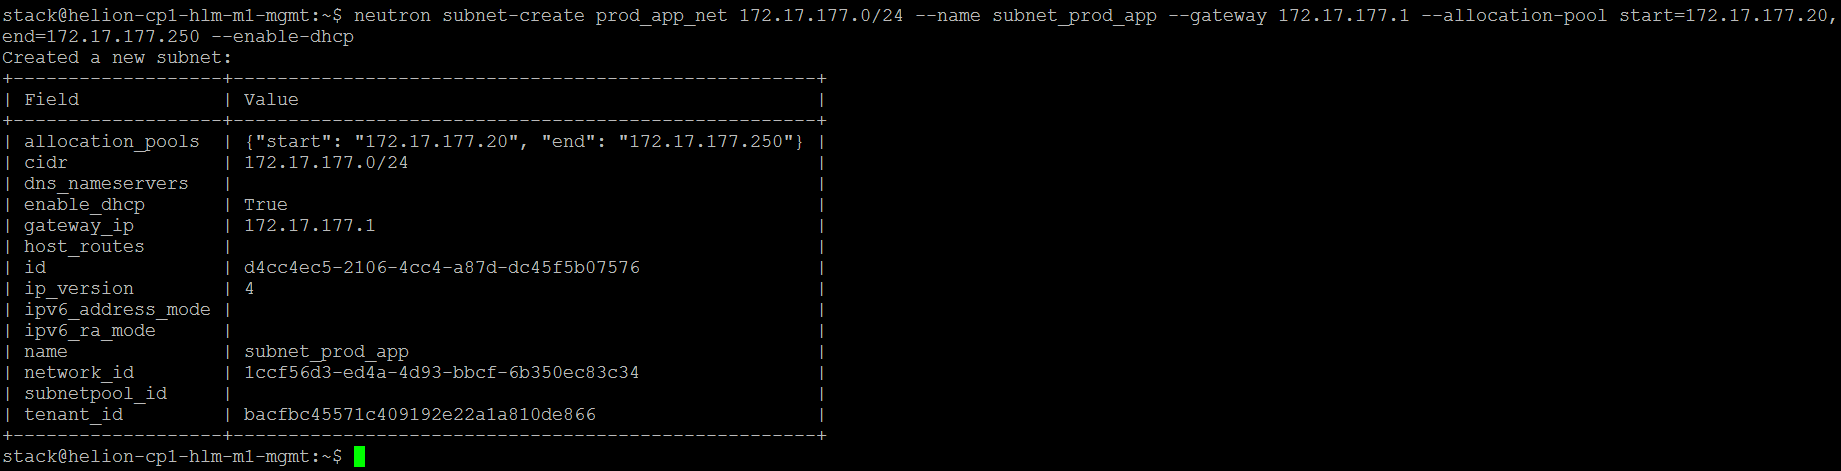
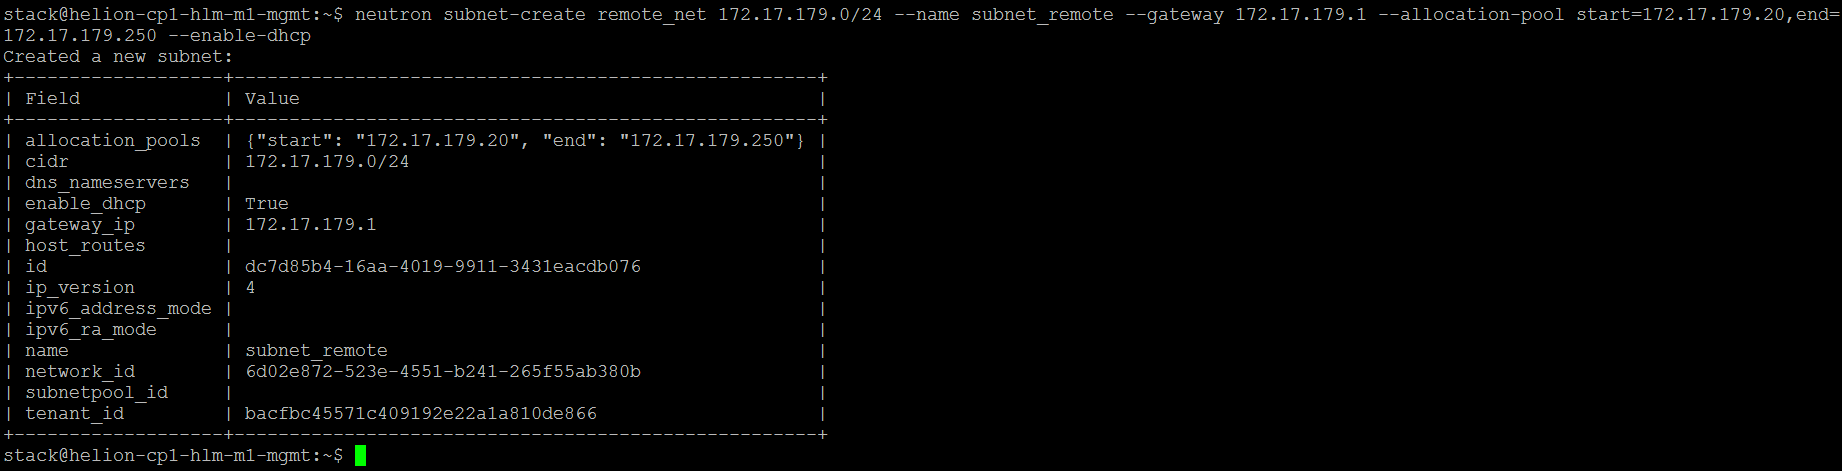
- 各ネットワークのサブネットを作成する
- neutron subnet-create dev_test_net 172.17.175.0/24 –name subnet_dev_test –gateway 172.17.175.1 –allocation-pool start=172.17.175.20,end=172.17.175.250 –enable-dhcp
- neutron subnet-create prod_web_net 172.17.176.0/24 –name subnet_prod_web –gateway 172.17.176.1 –allocation-pool start=172.17.176.20,end=172.17.176.250 –enable-dhcp

- neutron subnet-create prod_app_net 172.17.177.0/24 –name subnet_prod_app –gateway 172.17.177.1 –allocation-pool start=172.17.177.20,end=172.17.177.250 –enable-dhcp
- neutron subnet-create prod_db_net 172.17.178.0/24 –name subnet_prod_db –gateway 172.17.178.1 –allocation-pool start=172.17.178.20,end=172.17.178.250 –enable-dhcp


- neutron subnet-create remote_net 172.17.179.0/24 –name subnet_remote –gateway 172.17.179.1 –allocation-pool start=172.17.179.20,end=172.17.179.250 –enable-dhcp
- 前述のようにアプリケーションティアのVMを作成する
- nova flavor-list

- nova image-list

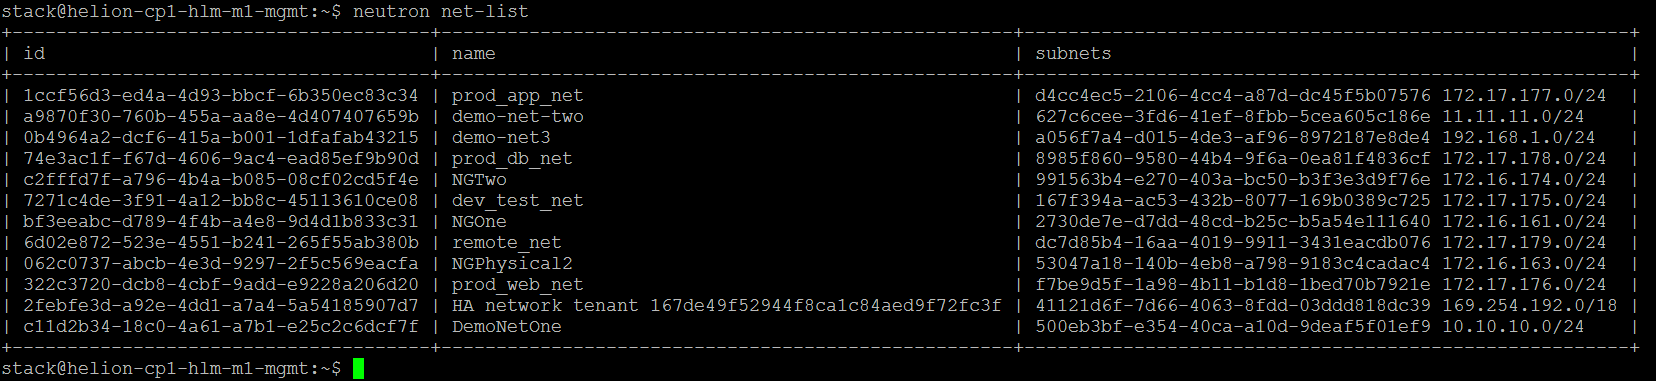
- neutron net-list
- nova secgroup-list

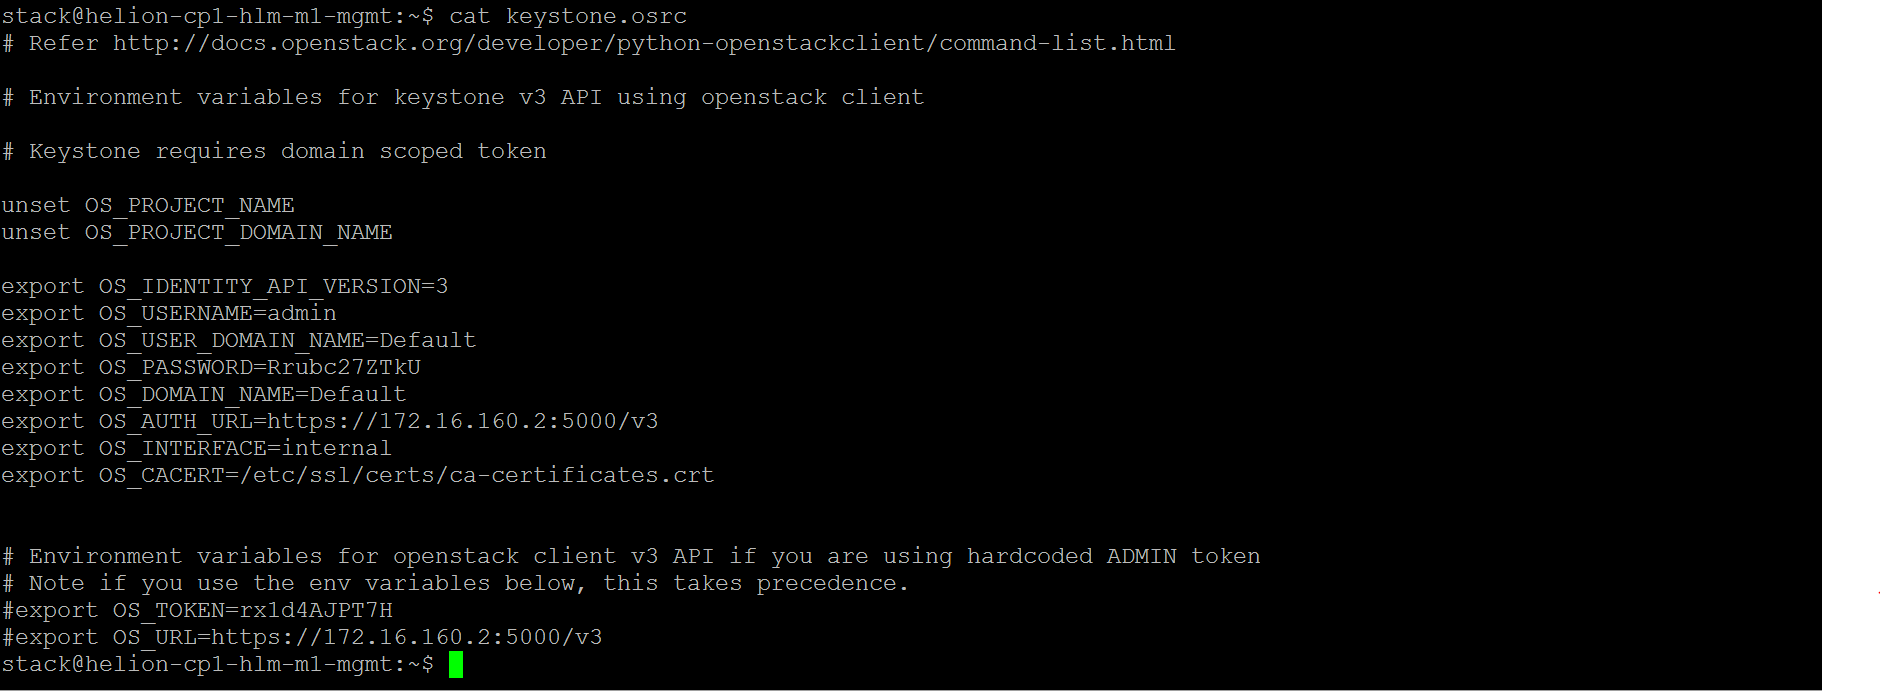
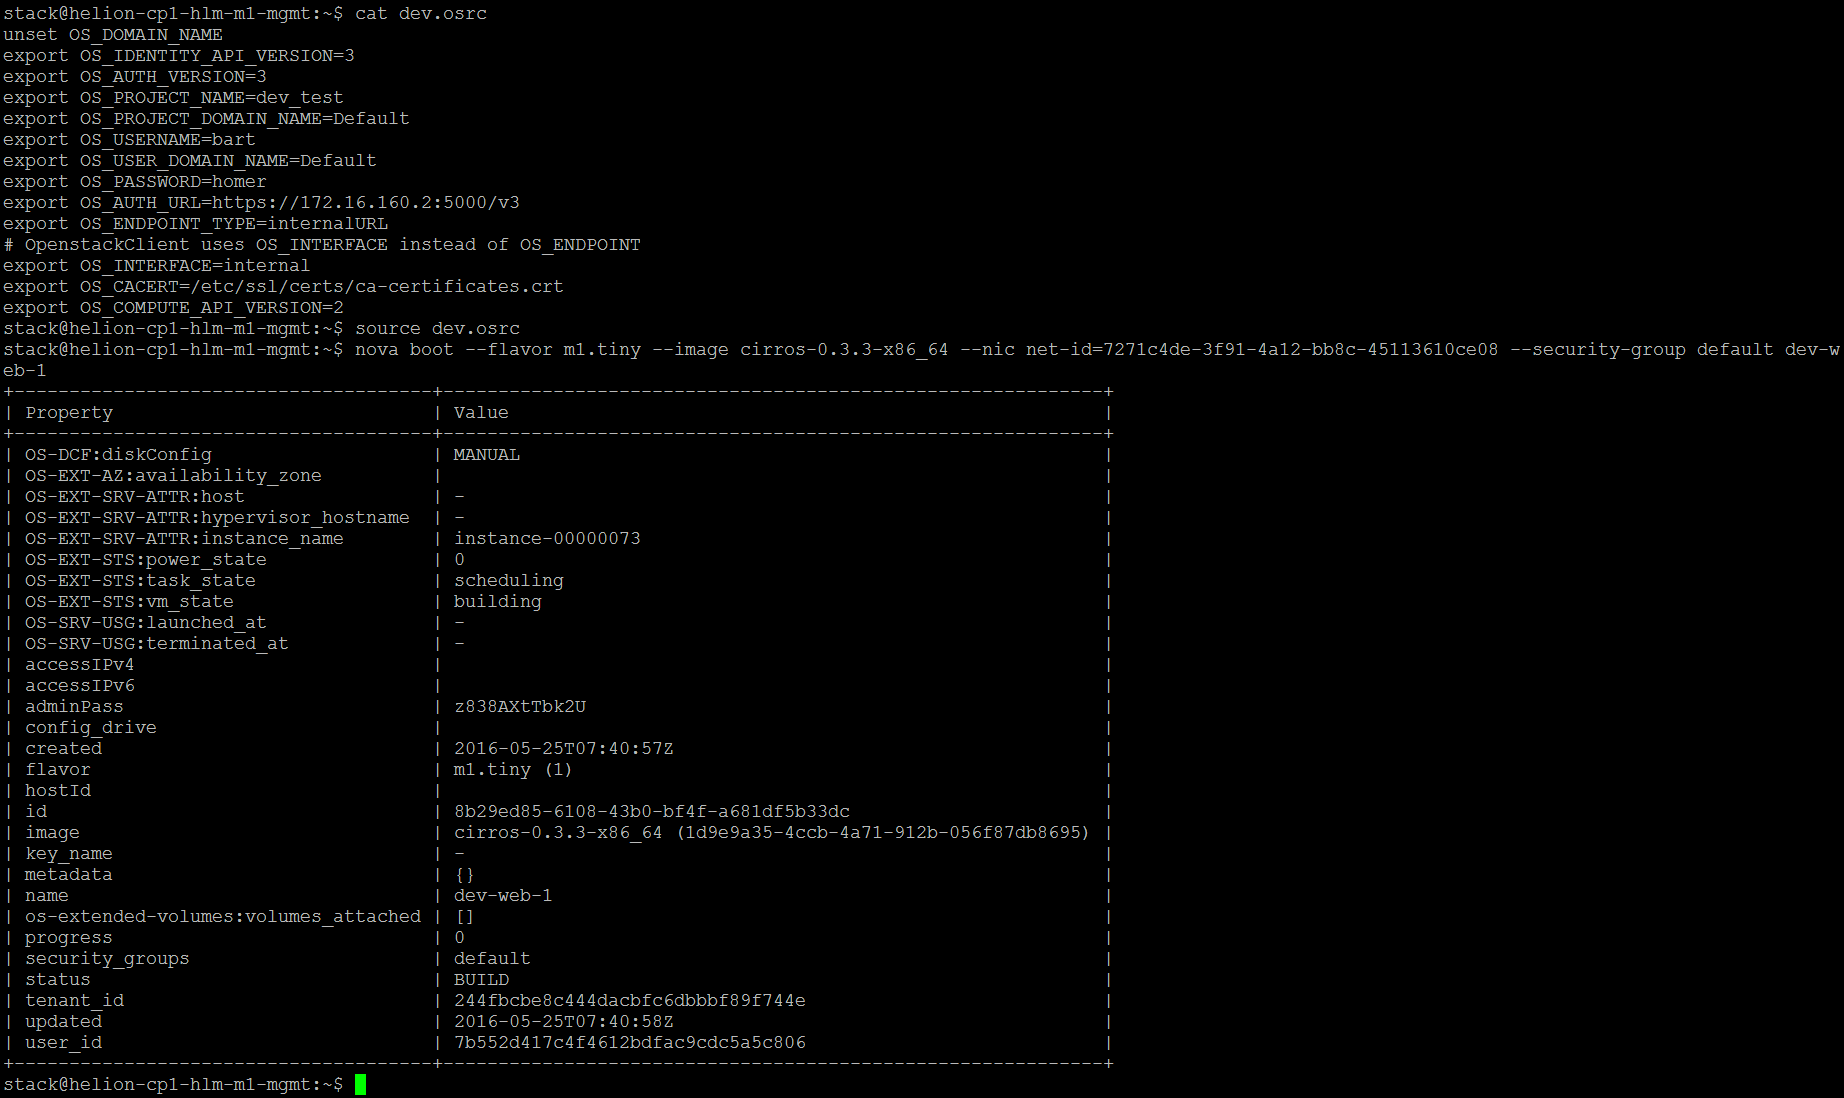
- プロジェクトのadmin rcファイルをソースする
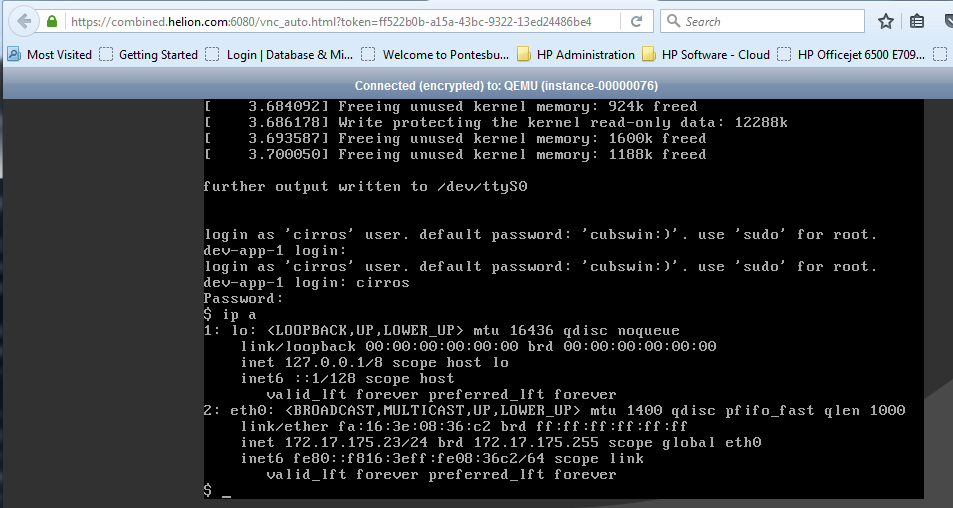
- nova boot –flavor m1.tiny –image cirros-0.3.3-x86_64 –nic net-id=7271c4de-3f91-4a12-bb8c-45113610ce08 –security-group default dev-web-1
- nova boot –flavor m1.tiny –image cirros-0.3.3-x86_64 –nic net-id=7271c4de-3f91-4a12-bb8c-45113610ce08 –security-group default dev-app-1
- nova boot –flavor m1.tiny –image cirros-0.3.3-x86_64 –nic net-id=7271c4de-3f91-4a12-bb8c-45113610ce08 –security-group default dev-db-1
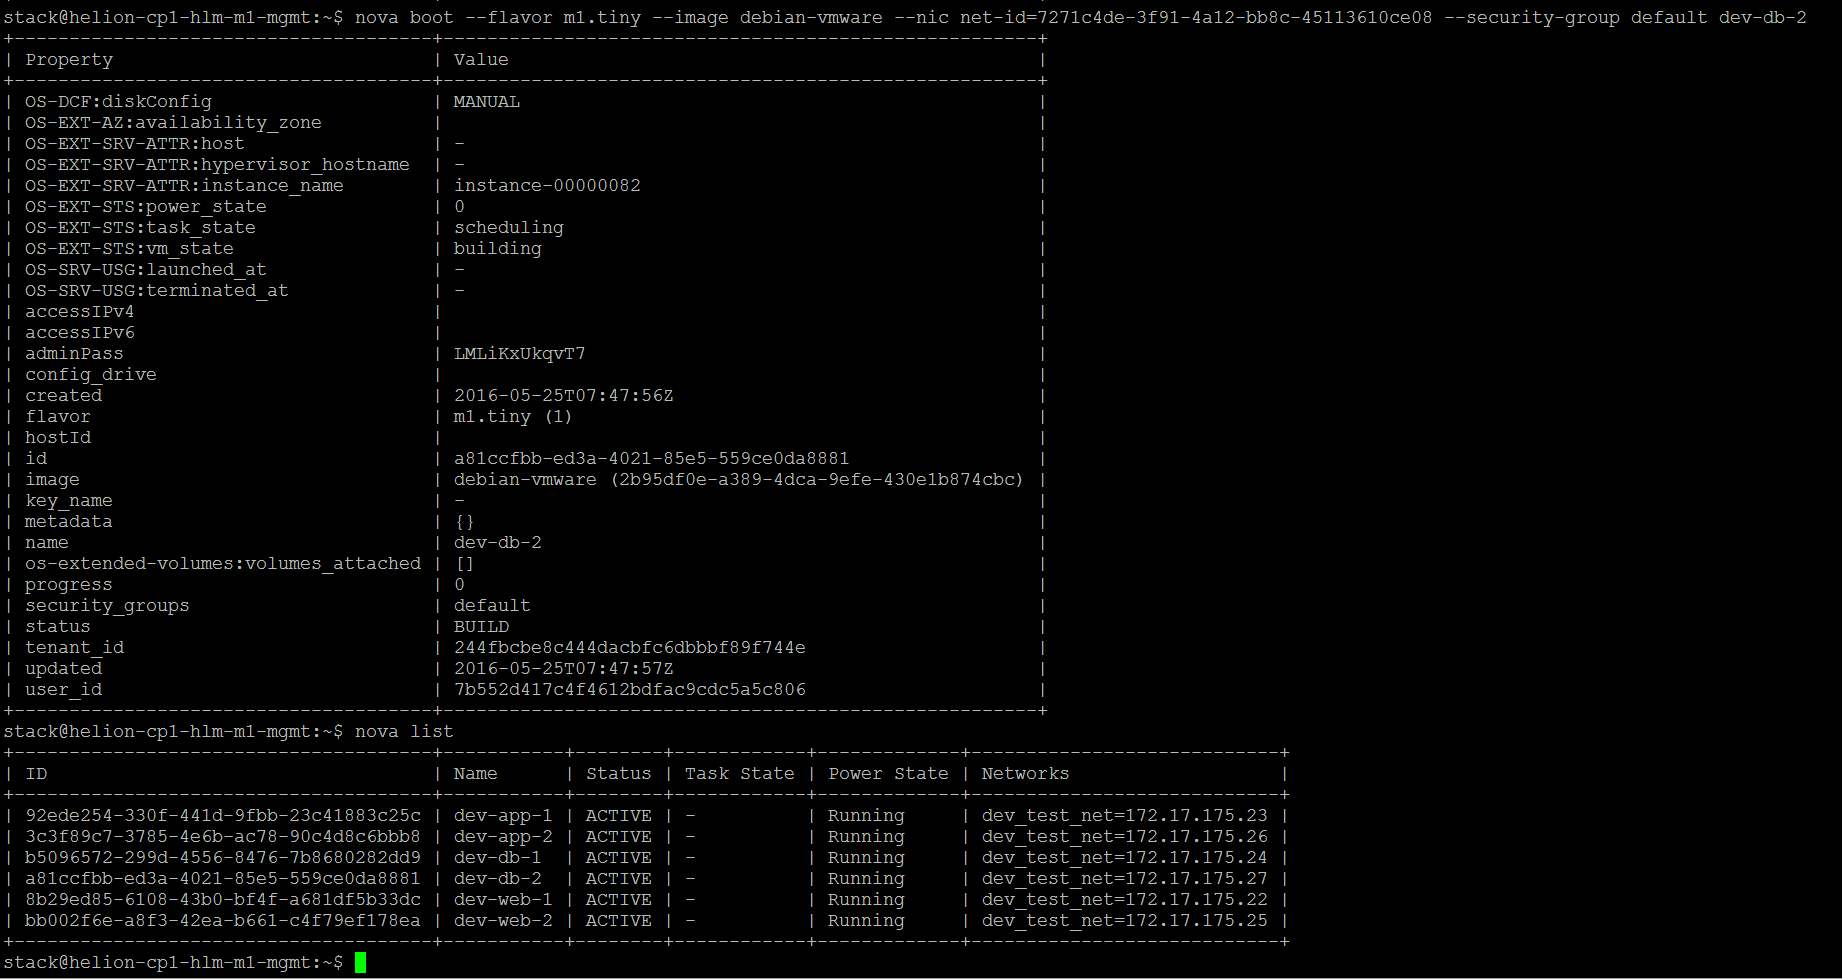
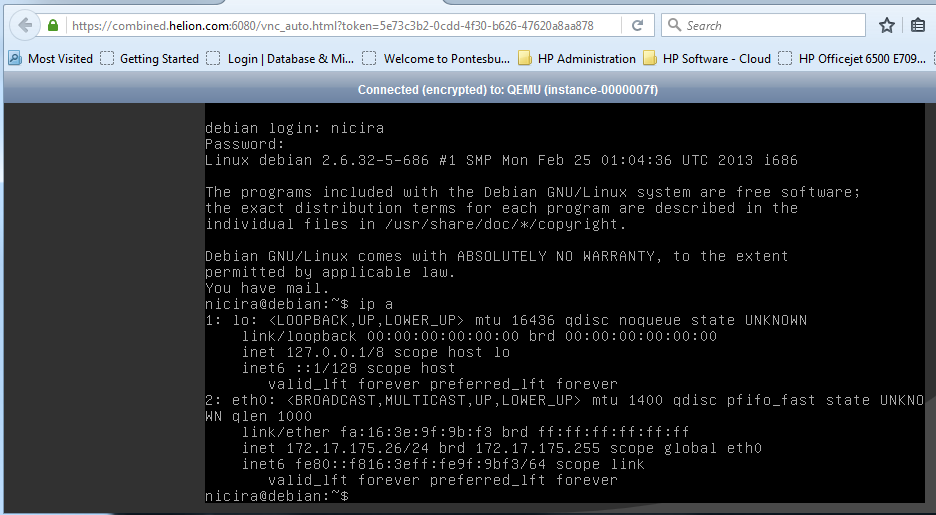
- nova boot –flavor m1.tiny –image debian-vmware –nic net-id=7271c4de-3f91-4a12-bb8c-45113610ce08 –security-group default dev-web-2
- nova boot –flavor m1.tiny –image debian-vmware –nic net-id=7271c4de-3f91-4a12-bb8c-45113610ce08 –security-group default dev-app-2
- nova boot –flavor m1.tiny –image debian-vmware –nic net-id=7271c4de-3f91-4a12-bb8c-45113610ce08 –security-group default dev-db-2
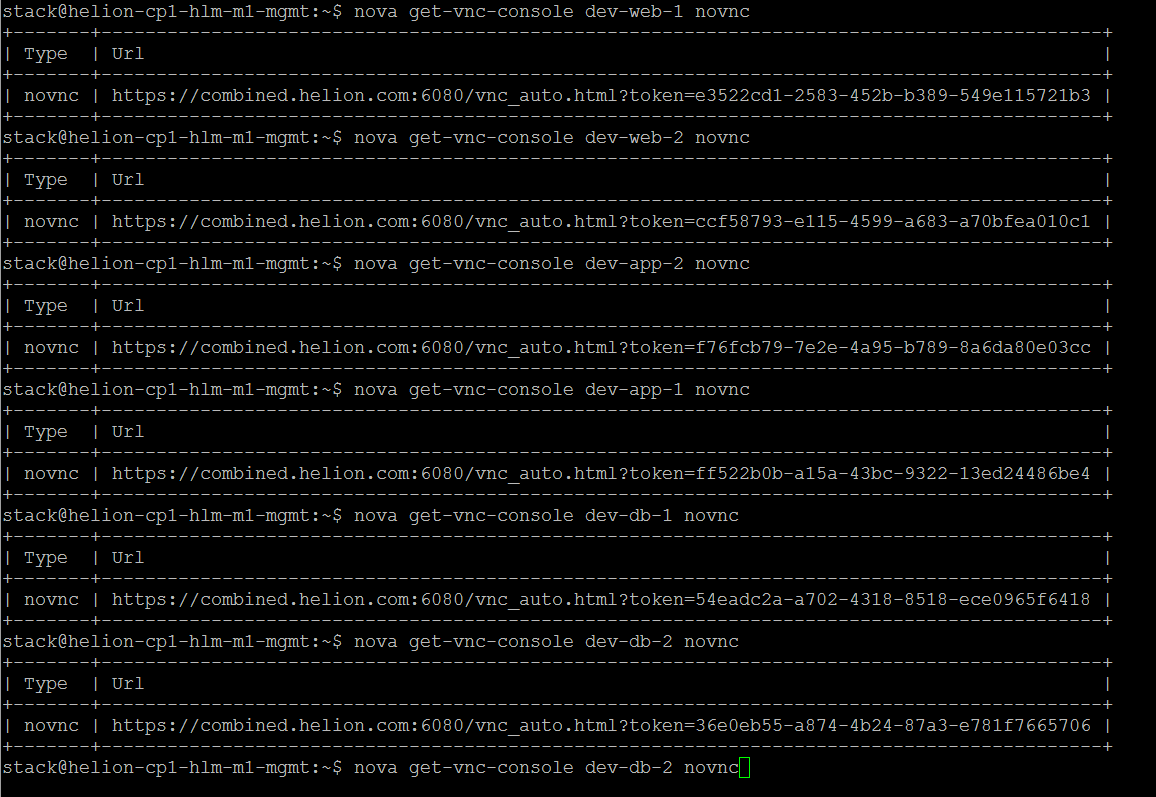
- インスタンスのコンソールにアクセスする方法の例 [vmwareとkvmの両方]
- nova get-vnc-console dev-app-1 novnc
- nova get-vnc-console dev-web-1 novnc
- nova get-vnc-console dev-db-1 novnc
- nova get-vnc-console dev-app-2 novnc
- nova get-vnc-console dev-web-2 novnc
- nova get-vnc-console dev-db-2 novnc
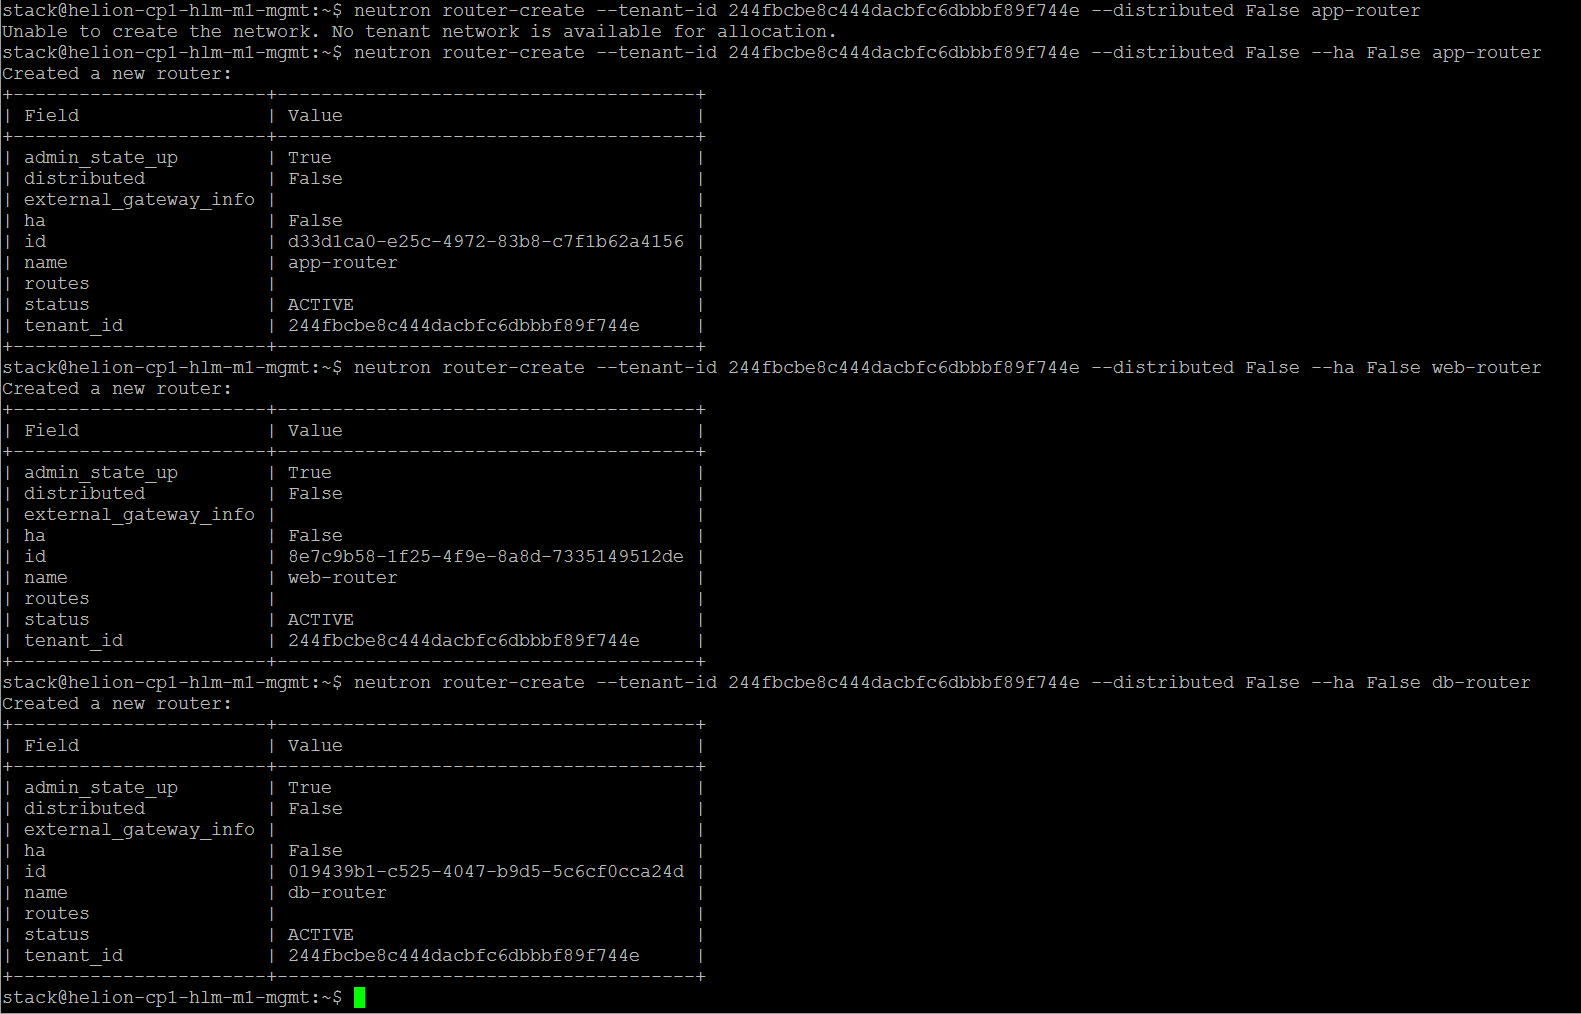
- サーバーに対するSNATルートの追加(利用可能なVLAN IDの制約により、以下でHaをfalseに設定)
- neutron router-create –tenant-id 244fbcbe8c444dacbfc6dbbbf89f744e –distributed False –ha False db-router
- neutron router-create –tenant-id 244fbcbe8c444dacbfc6dbbbf89f744e –distributed False –ha False app-router
- neutron router-create –tenant-id 244fbcbe8c444dacbfc6dbbbf89f744e –distributed False –ha False web-router

- ルーターの外部ゲートウェイを設定する
- neutron router-gateway-set app-router NGOne
- neutron router-gateway-set web-router NGTwo
- neutron router-gateway-set db-router NGPhysical2

- 必要なサブネットをルーターに接続する
- neutron router-interface-add d33d1ca0-e25c-4972-83b8-c7f1b62a4156 167f394a-ac53-432b-8077-169b0389c725

- デフォルトゲートウェイポートはすでにネットワーク上の最初のルーターによって消費されています。サブネット上に2つの新しいポートを作成し、これらの詳細を2番目と3番目のルーターに追加する必要があります。
- neutron port-create –tenant-id 244fbcbe8c444dacbfc6dbbbf89f744e –name NGTwo-if dev_test_net
- neutron port-create –tenant-id 244fbcbe8c444dacbfc6dbbbf89f744e –name NGPhysical2 dev_test_net
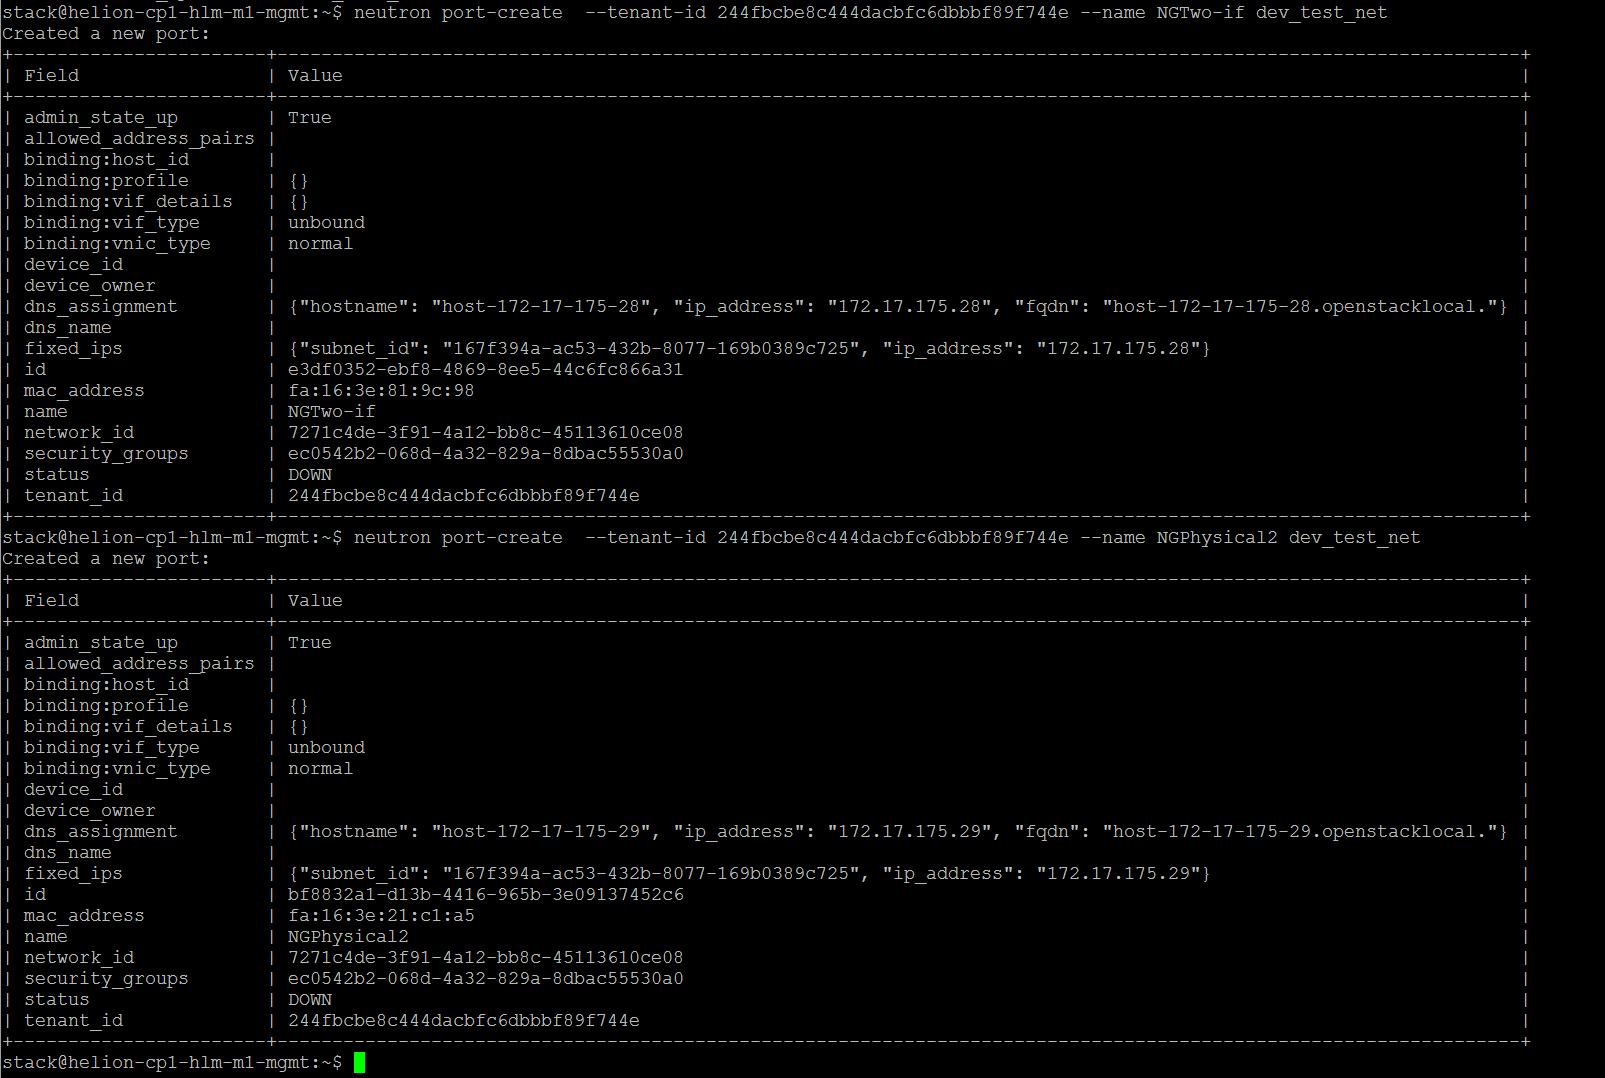
- これで、新しいインターフェースポートをルーターに関連付けることができます
- neutron router-interface-add 8e7c9b58-1f25-4f9e-8a8d-7335149512de port=e3df0352-ebf8-4869-8ee5-44c6fc866a31
- neutron router-interface-add 019439b1-c525-4047-b9d5-5c6cf0cca24d port=bf8832a1-d13b-4416-965b-3e09137452c6

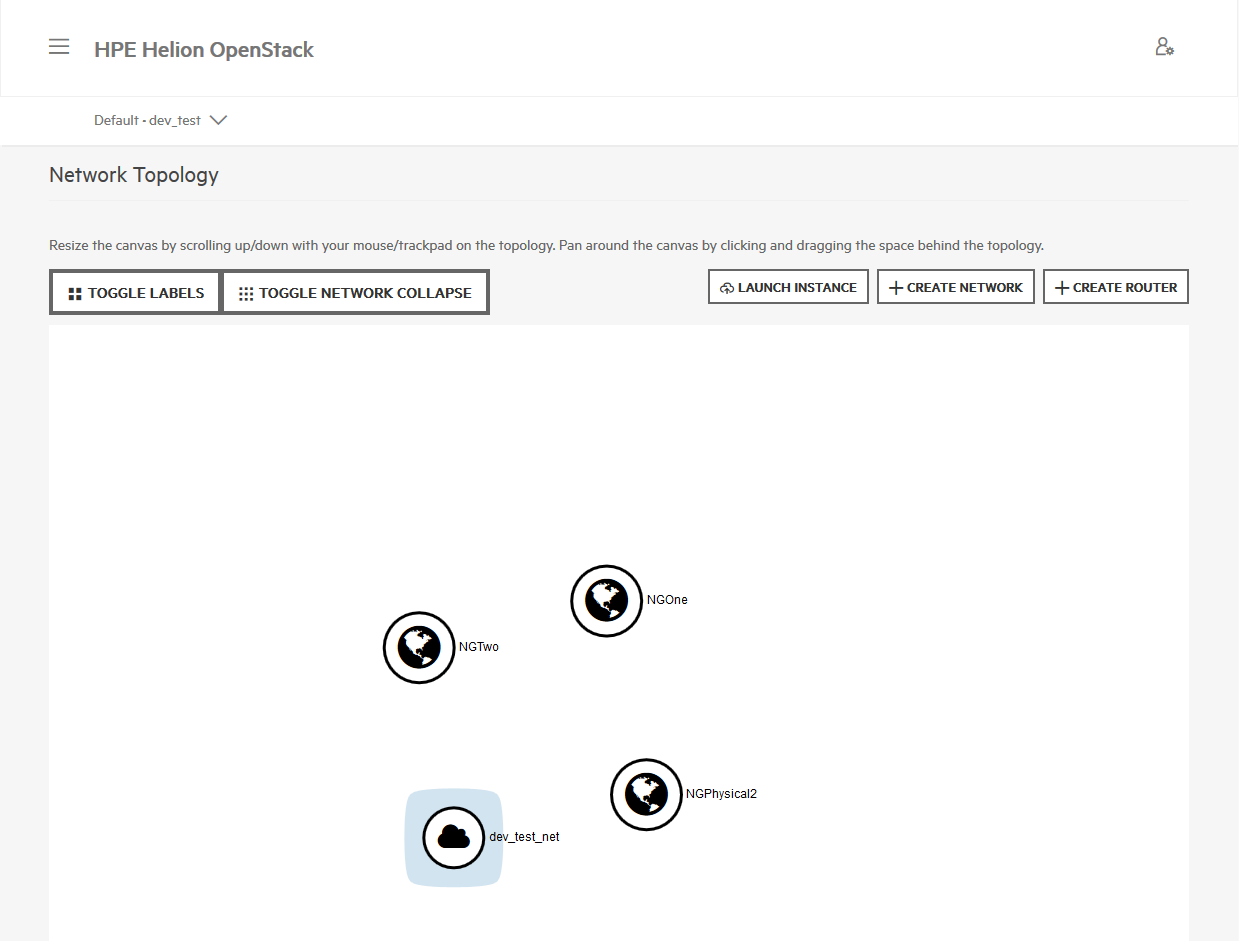
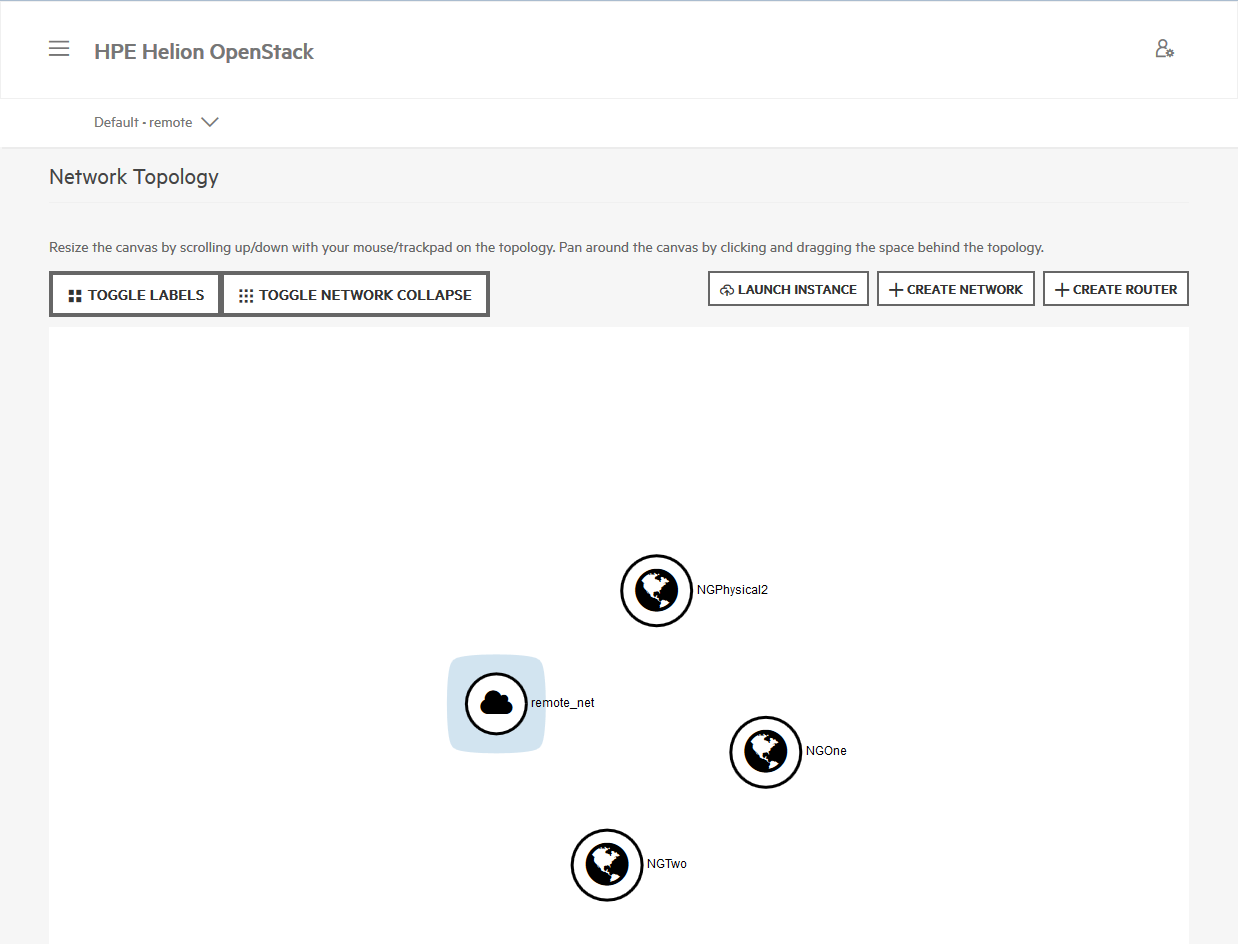
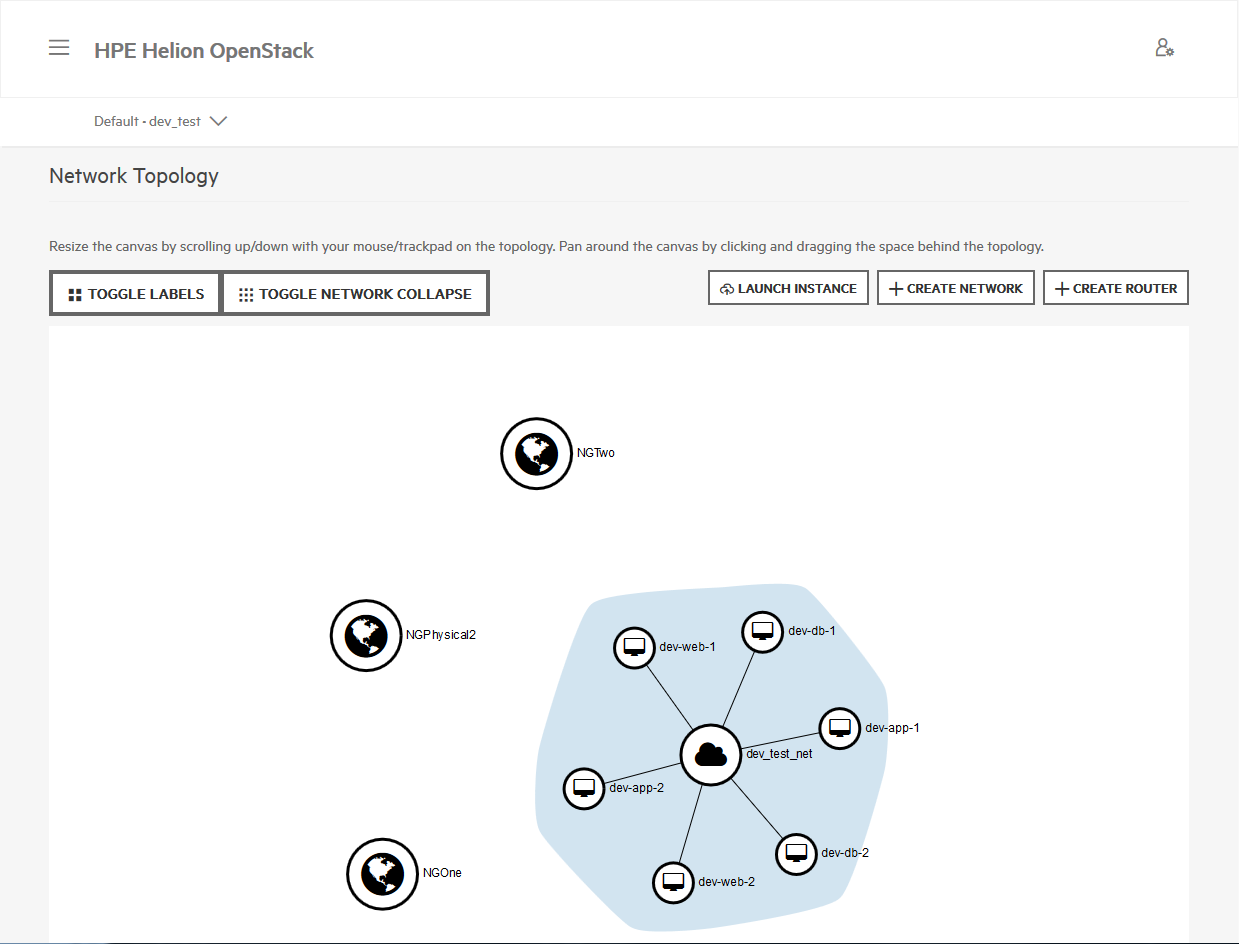
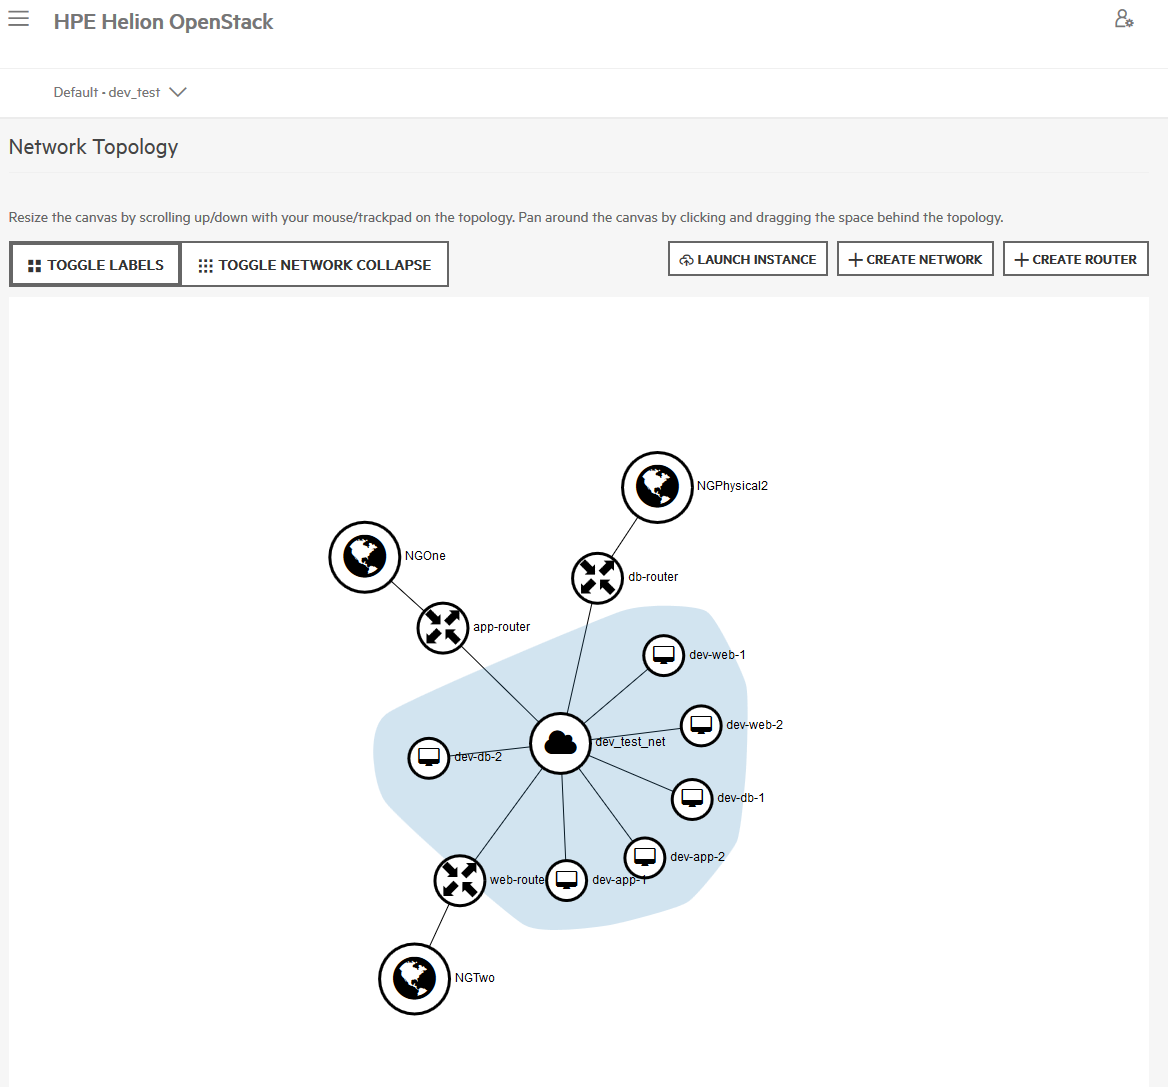
- dev-testプロジェクトは現在、以下のような状態になっているはずです:
-
3つの異なるNATゲートウェイは、SNATとDNATの両方の機能を提供できます。セキュリティグループは、サーバーとゲートウェイ間の分離を提供するために使用されます。
-
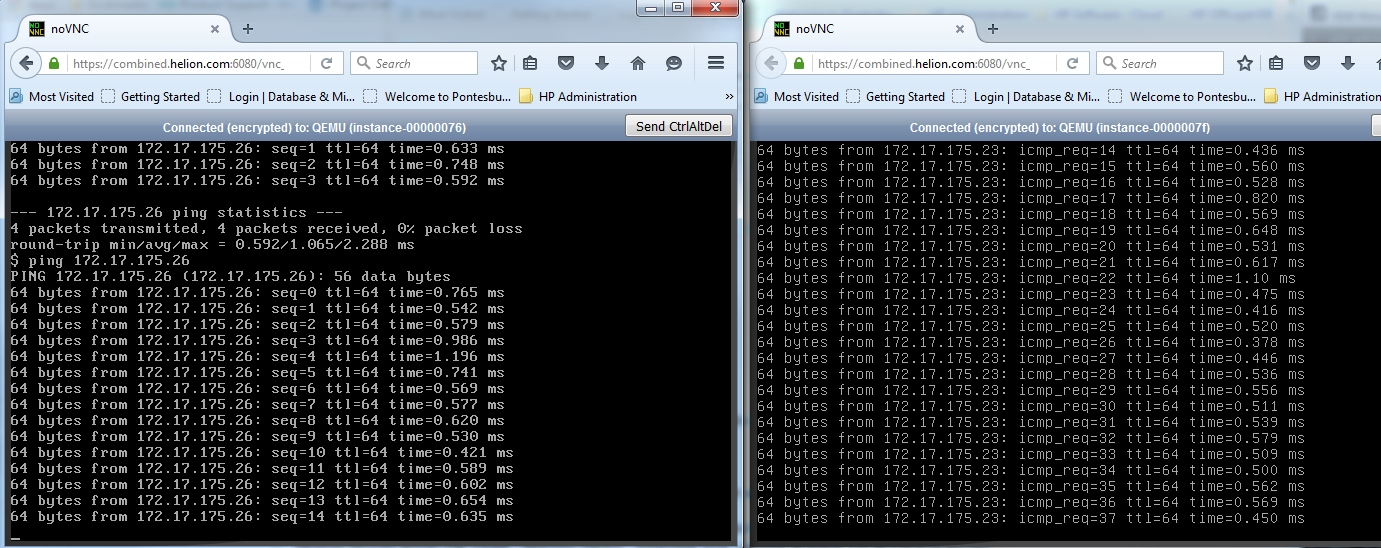
デフォルトのセキュリティグループは、同じテナントネットワーク上の仮想マシン間のトラフィックを許可します。このシナリオでは、kvmベースのVM dev-app-1を使用し、esxベースのVM dev-app-2からの分離を示します。
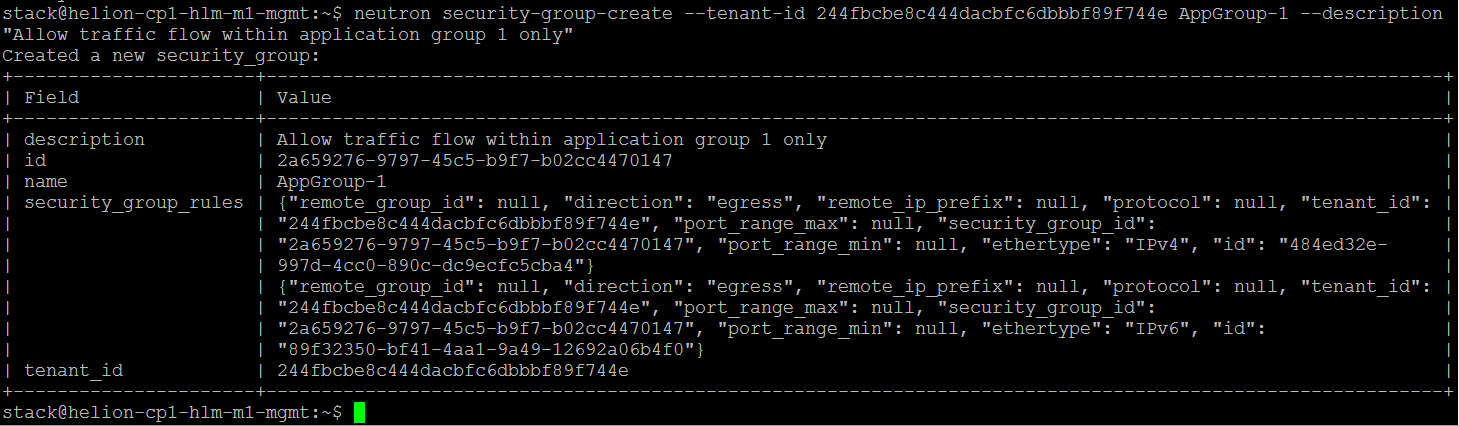
- 以下のセキュリティグループは、これら2つのサーバー間の分離を提供します。
- neutron security-group-create –tenant-id 244fbcbe8c444dacbfc6dbbbf89f744e AppGroup-1 –description “Allow traffic flow within application group 1 only”
-
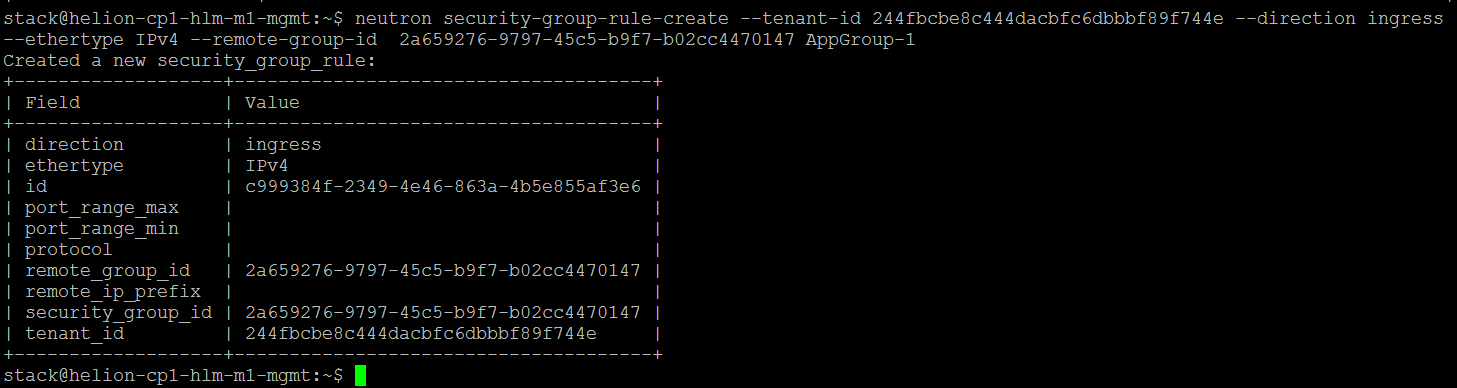
- neutron security-group-rule-create –tenant-id 244fbcbe8c444dacbfc6dbbbf89f744e –direction ingress –ethertype IPv4 –remote-group-id 2a659276-9797-45c5-b9f7-b02cc4470147 AppGroup-1
-
- nova –os-tenant-id 244fbcbe8c444dacbfc6dbbbf89f744e add-secgroup dev-app-1 AppGroup-1
-
すでに適用されている「default」セキュリティグループを削除する
- nova –os-tenant-id 244fbcbe8c444dacbfc6dbbbf89f744e remove-secgroup dev-app-1 default

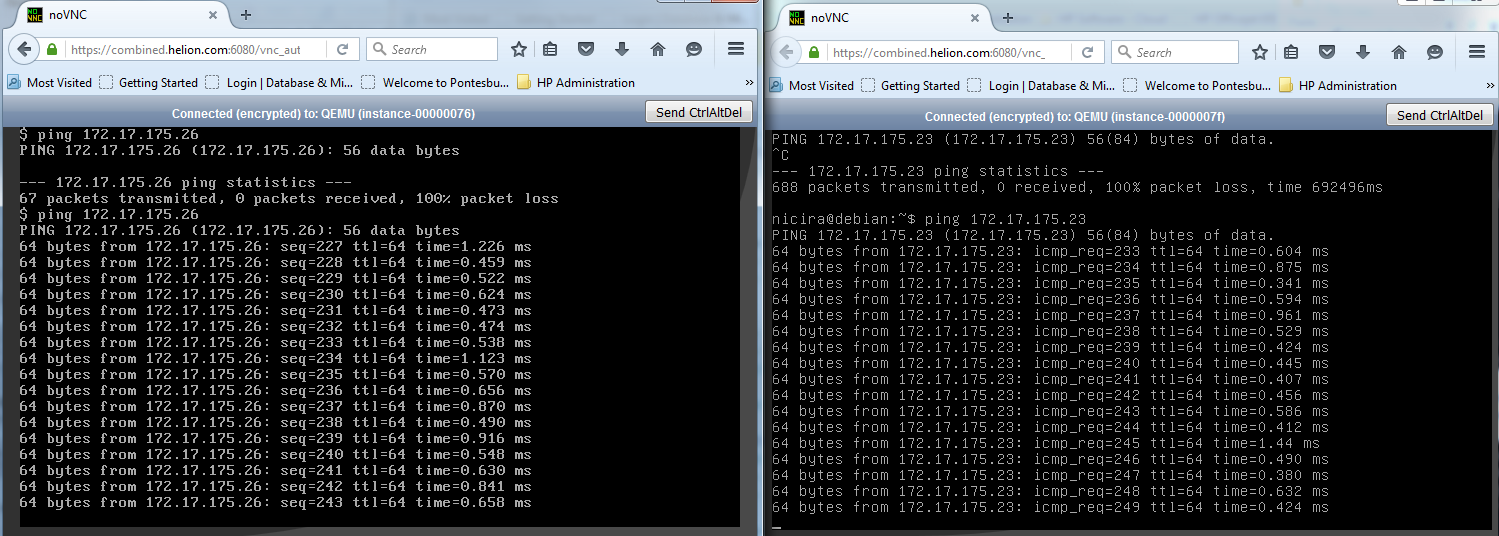
- これで、dev-app-1とdev-app2間のpingは失敗します

- 新しいセキュリティグループを適用すると、dev-app-2でターゲットグループ通信が有効になります
- nova –os-tenant-id 244fbcbe8c444dacbfc6dbbbf89f744e add-secgroup dev-app-2 AppGroup-1
これは明らかにセキュリティグループの非常に基本的なデモンストレーションです – 通信要件を明確に定義し、ルールに変換するだけの問題です。
残りの2つのプロジェクト、production & remoteの作成については、プロセスはまったく同じであり、完了するとこれらの追加トポロジが得られるはずです。
Originally published on allthingscloud.eu (2016-05-26).